Bunny Rabbit Cake Recipe – Adorable & Easy Bake
Bunny Rabbit Cake is more than just a dessert; it’s a gateway to whimsical joy and cherished memories. Imagin extracte the delight on children’s faces, or even your own, as this adorable creation emerges from the oven. This isn’t just any cake; it’s a centerpiece, a conversation starter, and a testament to the magic that a little bit of creativity can bake into life. People absolutely adore this Bunny Rabbit Cake because it taps into our collective love for all things cute and celebratory. It’s perfect for Easter, spring birthdays, or any occasion where you want to sprinkle a little extra sweetness and fun. What truly makes this Bunny Rabbit Cake special is its charming design, which is surprisingly achievable and brings an instant smile. Get ready to hop into a world of delicious fun with this delightful recipe!

Bunny Rabbit Cake
There’s something truly magical about a cake that brings a smile to everyone’s face, and a bunny rabbit cake is undeniably one of those showstoppers! Perfect for Easter, birthdays, or just because, this adorable creation is surprisingly achievable and incredibly rewarding to make. We’re going to walk through creating a fluffy, delicious cake that’s as delightful to eat as it is to behold. Forget store-bought novelty cakes; with a little bit of love and these simple instructions, you’ll be the star baker in no time. This recipe focuses on a classic vanilla cake base, which is versatile and universally loved, and we’ll cover everything from baking the cake to assembling and decorating your charming bunny.
Ingredients:
Baking the Bunny Base
The foundation of our bunny cake is a perfectly baked cake. We’ll be using a simple yet foolproof vanilla cake recipe that yields a tender crum extractb and a delightful flavor. To start, preheat your oven to 350°F (175°C). You’ll need two 8-inch round cake pans for the bunny’s body and head. Grease and flour these pans generously to prevent any sticking. This is a crucial step to ensure your cakes release beautifully after baking.
In a medium bowl, whisk together the all-purpose flour, baking soda, baking powder, and salt. This dry ingredient mixture will ensure our cake has a good lift and a consistent texture. Set this aside.
In a large bowl, cream together the softened unsalted butter and granulated sugar until light and fluffy. This step incorporates air into the batter, which contributes to the cake’s lightness. You can use an electric mixer for this, or a sturdy whisk and some elbow grease. Gradually add the large eggs, one at a time, beating well after each addition. Stir in the vanilla extract.
Now, it’s time to combine the wet and dry ingredients. In a separate bowl or jug, whisk together the buttermilk and vegetable oil. Gradually add the dry ingredients to the wet ingredients alternately, begin extractning and ending with the dry ingredients. Mix on low speed just until combined. Be careful not to overmix, as this can result in a tough cake. The batter should be smooth and pourable.
Divide the batter evenly between the two prepared cake pans. Smooth the tops with a spatula. Bake for 30-35 minutes, or until a wooden skewer inserted into the center of the cakes comes out clean. Once baked, let the cakes cool in their pans for about 10-15 minutes before inverting them onto a wire rack to cool completely. It’s important that the cakes are completely cool before you start decorating. If they’re still warm, your fondant will melt and create a sticky mess.
Assembling Your Adorable Bunny
Once your cakes are completely cool, it’s time to bring our bunny to life! You’ll need a sharp knife to level the tops of your cakes if they have domed. This will create flat surfaces for easier stacking.
Take one of the 8-inch cakes; this will be the bunny’s body. Place it on your serving platter or cake board. You can add a layer of your favorite frosting here if you like, but for a fondant-covered cake, it’s not strictly necessary.
The second 8-inch cake will form the bunny’s head. You’ll need to cut this cake in half horizontally. A long serrated knife works best for this. You’ll then want to stack these two halves on top of each other, creating a slightly taller, rounder shape for the head. You can use a little bit of frosting or edible glue between the layers to secure them.
Now, we need to shape our bunny. Place the two cake halves for the head slightly in front of the cake body on your serving platter. You can gently trim the edges of the head cake to create a more rounded shape, if desired.
Decorating with Fondant Fun
This is where the real magic happens! We’ll be using fondant to give our bunny its smooth, clean finish and adorable features. First, prepare your fondant. If you are using white fondant, knead it until it’s smooth and pliable. If you want to color any parts, now is the time. For instance, you might want a little bit of pink fondant for the ears.
Roll out a generous portion of the white fondant into a large circle, big enough to cover the bunny’s body. Carefully drape this over the body cake, smoothing it down and tucking it in around the base to eliminate any air pockets and create a seamless look. Trim any excess fondant from the bottom.
Next, take another portion of white fondant and roll it out to cover the head. Drape this over the head cake, again smoothing it down and tucking it in. Use a little bit of edible glue or a tiny bit of water to adhere the head to the body.
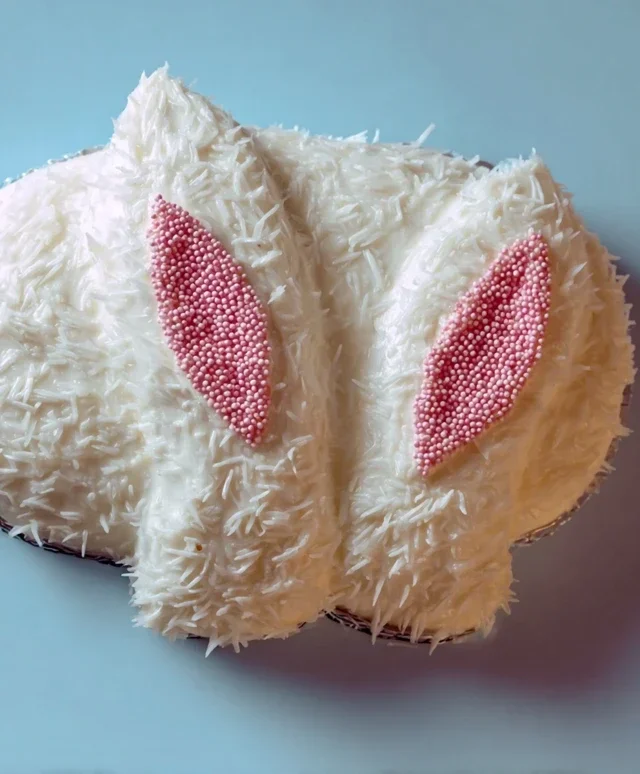
Now, let’s create those iconic bunny ears! Roll out two ovals of white fondant for the main part of the ears. You can gently curve them to give them a natural look. For the inner ear, roll out small, thinner pieces of pink fondant and attach them to the center of the white ear pieces using edible glue. Once the ears are assembled, gently attach them to the top of the bunny’s head. You can prop them up slightly with a bit of crum extractpled parchment paper while the fondant sets if you want them to stand more upright.
Finishing Touches for a Fabulous Friend
With the main body and ears in place, it’s time for the smaller, yet impactful details. Roll out small balls of white fondant for the bunny’s tail. You can attach this to the back of the bunny’s body. For the eyes and nose, you have a few options. You can roll out small balls of black or brown fondant for the eyes and a pink or darker shade of red fondant for the nose. Alternatively, you can use edible markers or food coloring to draw on these features if you prefer a simpler approach.
To create a little mouth, you can use a small knife or a food-safe sculpting tool to carefully cut a small line beneath the nose. And there you have it – a sweet, smiling bunny ready to hop into your celebrations! This bunny rabbit cake is not only a feast for the eyes but also a delicious treat that will be cherished by all who see it. Enjoy the oohs and aahs, and most importantly, enjoy every bite of your homemade masterpiece!
Conclusion:
And there you have it – your very own adorable Bunny Rabbit Cake! This recipe is a guaranteed hit for Easter, birthdays, or any occasion that calls for a touch of whimsical charm. Its delightful appearance is matched by its delicious, moist cake base, making it a joy to bake and even more of a delight to eat. The versatility of this bunny cake means you can easily adapt it to your favorite cake flavors and frosting preferences, ensuring it’s perfectly tailored to your taste buds.
For serving suggestions, imagin extracte this bunny cake as the centerpiece of your dessert table, perhaps adorned with pastel sprinkles or fresh berries. It pairs wonderfully with a scoop of vanilla ice cream or a dollop of whipped cream. Don’t be afraid to get creative with variations! Consider adding a hint of lemon zest to the batter for a bright flavor, or using chocolate frosting for a richer taste. This Bunny Rabbit Cake is more than just a dessert; it’s an experience that brings smiles and creates sweet memories. I encourage you to give it a try – you won’t be disappointed!
Frequently Asked Questions about Bunny Rabbit Cake:
How do I store leftover Bunny Rabbit Cake?
Store any leftover Bunny Rabbit Cake in an airtight container at room temperature for up to 3 days, or in the refrigerator for up to 5 days. Ensure it’s well-covered to maintain its moisture and prevent it from drying out.
Can I make the cake ahead of time?
Absolutely! You can bake and cool the cake layers a day in advance. Once completely cooled, wrap them tightly in plastic wrap and store at room temperature. Frosting the cake the day you plan to serve it is generally recommended for the freshest taste and appearance.
What if I don’t have a bunny-shaped cake pan?
No problem! You can still create a bunny shape using a standard round or rectangular cake pan. Bake your cake, then carefully cut out a bunny silhouette freehand or by using a printed template. It might require a little more artistic flair, but the result will be just as charming!
Bunny Rabbit Cake
A delightful and whimsical cake shaped like a bunny rabbit, perfect for Easter celebrations or any springtime party.
Ingredients
-
2 cups all-purpose flour
-
1.5 cups granulated sugar
-
1 teaspoon baking soda
-
0.5 teaspoon salt
-
1 cup unsweetened applesauce
-
0.5 cup vegetable oil
-
2 large eggs
-
1 teaspoon vanilla extract
-
1 cup milk (whole or 2%)
Instructions
-
Step 1
Preheat oven to 350°F (175°C). Grease and flour a 9×13 inch baking pan and a 1.5-quart bowl (for the head). -
Step 2
In a large bowl, whisk together flour, sugar, baking soda, and salt. -
Step 3
In a separate bowl, whisk together applesauce, vegetable oil, eggs, and vanilla extract. -
Step 4
Add the wet ingredients to the dry ingredients and mix until just combined. Gradually add milk and mix until smooth. -
Step 5
Pour batter into the prepared baking pan and the prepared bowl (filling the bowl about two-thirds full). -
Step 6
Bake the cake in the 9×13 pan for 30-35 minutes, and the bowl for 25-30 minutes, or until a toothpick inserted into the center comes out clean. -
Step 7
Let cakes cool in pans for 10 minutes, then invert onto a wire rack to cool completely before decorating.
Important Information
Nutrition Facts (Per Serving)
It is important to consider this information as approximate and not to use it as definitive health advice.
Allergy Information
Please check ingredients for potential allergens and consult a health professional if in doubt.