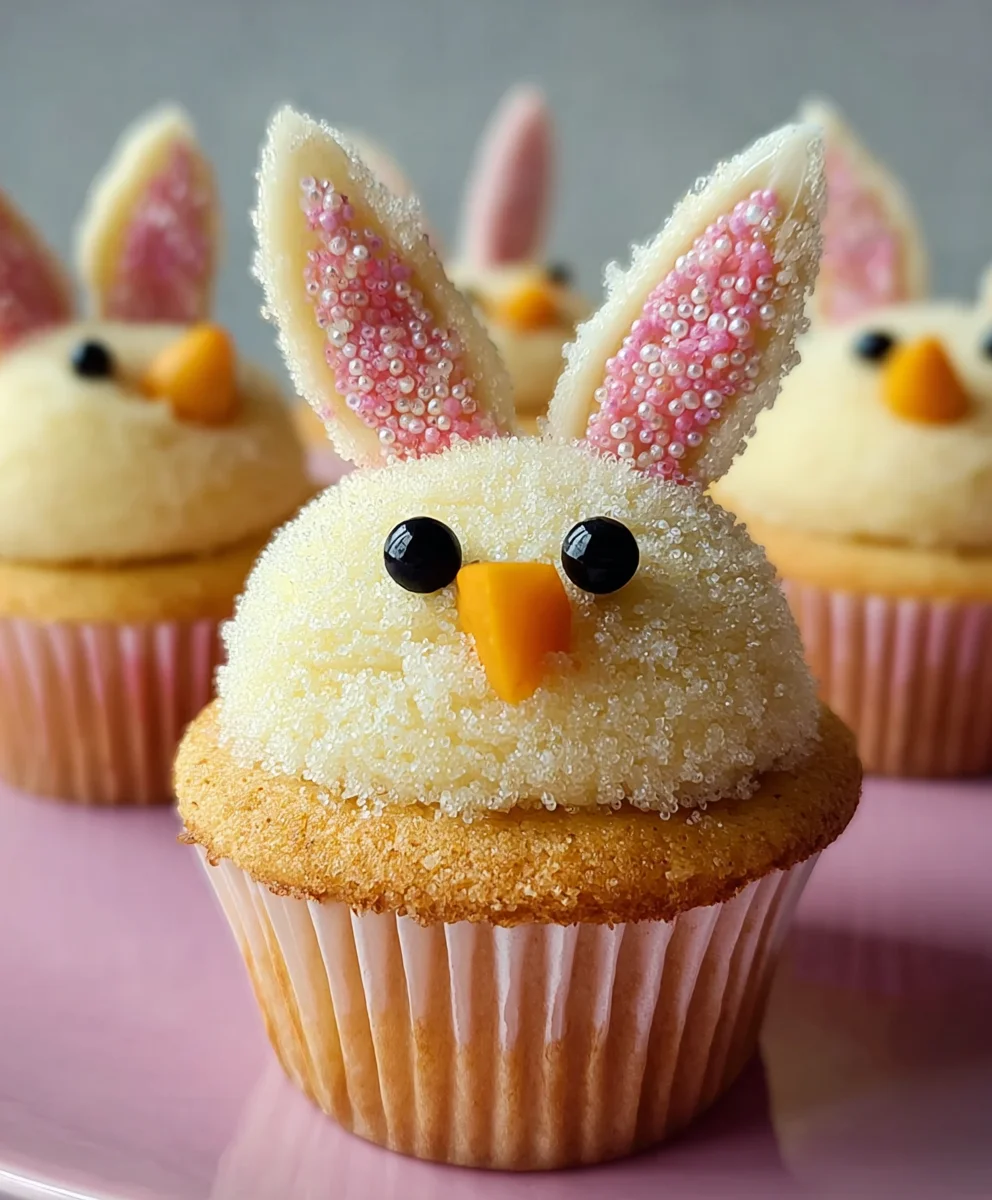
Easter Bunny Chick Cupcakes – Cute & Easy Treats
Easter Bunny and Chick Cupcakes are more than just a sweet treat; they are a miniature celebration of spring and the joy that comes with this beloved holiday. There’s an undeniable magic in biting into a perfectly moist cupcake topped with adorable, edible characters that instantly bring a smile to your face. Families adore these delightful creations, not just for their festive appearance, but for the comforting taste of homemade goodness they represent. What truly makes these Easter Bunny and Chick Cupcakes special is the ability to personalize them, transforming simple ingredients into edible works of art that delight both the eyes and the palate. Whether you’re a seasoned baker or a novice in the kitchen, mastering these charming treats is incredibly rewarding and guarantees a show-stopping centerpiece for any Easter gathering. Get ready to create some unforgettable memories, one fluffy cupcake at a time!

Ingredients:
- 1 recipe Vanilla Cupcakes (or your favorite cake mix)
- 1 recipe Fluffy Vanilla Frosting (or store-bought frosting)
- Yellow and white sprinkles
- Large and mini marshmallows
- Pink colored sanding sugar
- Black decorator icing
- Jelly beans (pink for bunny noses)
- Orange colored gum or M&Ms (for chick beaks)
- Yellow food coloring (for chick frosting)
Preparing Your Cupcakes and Frosting
Baking the Cupcakes
Start by preparing your vanilla cupcakes according to your chosen recipe or cake mix instructions. Ensure you have enough batter to fill your cupcake liners about two-thirds full to allow for proper rising. Bake them until a toothpick inserted into the center comes out clean, indicating they are fully cooked. Once baked, let the cupcakes cool in their tins for a few minutes before transferring them to a wire rack to cool completely. It’s crucial that the cupcakes are entirely cool before frosting, otherwise, your frosting will melt and slide right off. If you’re short on time, you can even bake them the day before and store them in an airtight container at room temperature.
Making the Fluffy Vanilla Frosting
While your cupcakes are cooling, prepare your fluffy vanilla frosting. If you’re using a store-bought frosting, you can skip this step, but a homemade frosting often has a superior taste and texture. If making from scratch, follow your recipe closely, ensuring all ingredients are at the correct temperature for optimal whipping. Once your frosting is ready, set it aside. You’ll want to divide the frosting into two portions – one larger portion for the bunnies and a smaller portion for the chicks. To the smaller portion, add a few drops of yellow food coloring and mix thoroughly until you achieve a vibrant, sunny yellow hue. It’s better to start with a little coloring and add more gradually to avoid an overly intense color.
Decorating the Easter Bunny Cupcakes
Bunny Ears and Faces
This is where the magic happens! Take your cooled vanilla cupcakes and apply a generous swirl of the plain white vanilla frosting to the top of each. This will serve as the base for your adorable bunny faces. For the ears, you’ll need your large marshmallows. Carefully slice each large marshmallow in half lengthwise. Then, take a small amount of the white frosting and use it to adhere two marshmallow halves, cut-side facing inwards, onto the top of the frosted cupcake, creating the classic bunny ear shape. For the bunny’s facial features, use the black decorator icing to pipe two small dots for eyes. Then, take a pink jelly bean and gently press it into the center of the cupcake, just below the eyes, to create a sweet bunny nose.
Adding the Pink Details
To add a touch of extra charm and detail to your bunny cupcakes, you can use the pink colored sanding sugar. Lightly dampen the tips of the marshmallow ears with a tiny bit of water or a minuscule dab of frosting, then dip the damp tips into the pink sanding sugar. This will give your bunny ears a soft, rosy glow. Alternatively, you can sprinkle the pink sanding sugar directly onto the white frosting around the bunny’s face for a whimsical effect. You can also use the white sprinkles to add a bit more texture and visual interest to the white frosting. This is a great step to get creative with!
Creating the Adorable Chick Cupcakes
Chick Faces and Beaks
Now, let’s move on to our cheerful chick cupcakes. Take your cooled cupcakes and frost them generously with the yellow vanilla frosting you prepared earlier. Use a spatula or a piping bag with a round tip to create a smooth, domed surface of yellow frosting. For the chick’s features, you’ll use mini marshmallows. Take a mini marshmallow and cut it in half diagonally. Press the cut side of the marshmallow halves into the top of the yellow frosting on either side of the cupcake to create the illusion of fluffy chick feathers or ear tufts. For the beak, take an orange colored gum or an orange M&M and gently press it into the center of the frosting, just below where you envision the eyes would be.
Chick Eyes and Final Touches
Using the black decorator icing, carefully pipe two small dots above the orange beak to represent the chick’s eyes. You can make these dots as close together or as far apart as you like, depending on the expression you want to give your chick. For an extra festive touch, sprinkle some of the yellow and white sprinkles around the base of the chick cupcakes or lightly over the yellow frosting itself. This will add a bit of sparkle and texture, making your little chicks even more appealing. Ensure the black decorator icing is dry before moving the cupcakes to avoid smudgin extractg the adorable little eyes. You can even add a tiny touch of pink sanding sugar to the cheeks of the chicks for a little blush, if you desire.
Conclusion:
I hope you’ve had as much fun creating these adorable Easter Bunny and Chick Cupcakes as I have! This recipe is perfect for bringin extractg a touch of springtime cheer to any celebration. The fluffy vanilla cake, creamy buttercream frosting, and simple, charming decorations combine to make a delightful treat that’s almost too cute to eat. Almost! Remember, the key is to have fun with the decorating process. Don’t be afraid to get creative with your bunny ears and chick beaks!
These cupcakes are wonderful served on their own, but they also make a fantastic addition to an Easter dessert table alongside other spring-themed goodies. Consider pairing them with a refreshing glass of lemonade or a warm cup of tea for a perfect afternoon treat. For variations, you could experiment with different cake flavors like lemon or strawberry, or try a cream cheese frosting for an extra tangy twist. You can also use different colored sprinkles for a more vibrant look.
I encourage you to give these Easter Bunny and Chick Cupcakes a try. They are sure to be a hit with both kids and adults alike, and the joy of making them is almost as sweet as the cupcakes themselves. Happy baking and happy Easter!
Frequently Asked Questions:
Can I make the cupcake batter and frosting ahead of time?
Yes, you absolutely can! The unbaked cupcake batter can be stored in the refrigerator for up to 24 hours. Just make sure to bring it to room temperature and give it a good stir before baking. The buttercream frosting can also be made up to two days in advance and stored in an airtight container in the refrigerator. Let it soften at room temperature and re-whip it briefly before frosting your cooled cupcakes.
What other decorations can I use for the Easter Bunny and Chick Cupcakes?
There are so many fun options! For the bunnies, you could use mini marshmallows or white chocolate chips for the tail. For the chicks, tiny orange candies or sprinkles can be used for the beak and feet. Edible googly eyes are also a super cute and easy addition for both the bunnies and chicks. Get creative and let gin extractr imagination run wild!
Easter Bunny Chick Cupcakes – Cute & Easy Treats
Adorable and simple Easter-themed cupcakes featuring decorated bunnies and chicks, perfect for a festive celebration.
Ingredients
-
1 recipe Vanilla Cupcakes (or your favorite cake mix)
-
1 recipe Fluffy Vanilla Frosting (or store-bought frosting)
-
Yellow and white sprinkles
-
Large and mini marshmallows
-
Pink colored sanding sugar
-
Black decorator icing
-
Pink jelly beans (for bunny noses)
-
Orange colored gum or M&Ms (for chick beaks)
-
Yellow food coloring (for chick frosting)
Instructions
-
Step 1
Bake vanilla cupcakes according to your recipe or cake mix. Let cool completely on a wire rack. -
Step 2
Prepare fluffy vanilla frosting. Divide into two portions: one larger for bunnies, one smaller for chicks. Tint the smaller portion yellow with food coloring. -
Step 3
For bunny cupcakes: Frost with white frosting. Slice large marshmallows in half for ears, attach with frosting. Pipe black icing for eyes and add a pink jelly bean for the nose. -
Step 4
Add pink sanding sugar to the tips of bunny ears or around the face for extra detail. Optionally, add white sprinkles to the frosting. -
Step 5
For chick cupcakes: Frost with yellow frosting. Cut mini marshmallows diagonally for ‘feathers’ and press into frosting on the sides. -
Step 6
Press an orange gum or M&M into the center for the beak. Pipe two black dots for eyes above the beak. Add yellow and white sprinkles for sparkle.
Important Information
Nutrition Facts (Per Serving)
It is important to consider this information as approximate and not to use it as definitive health advice.
Allergy Information
Please check ingredients for potential allergens and consult a health professional if in doubt.