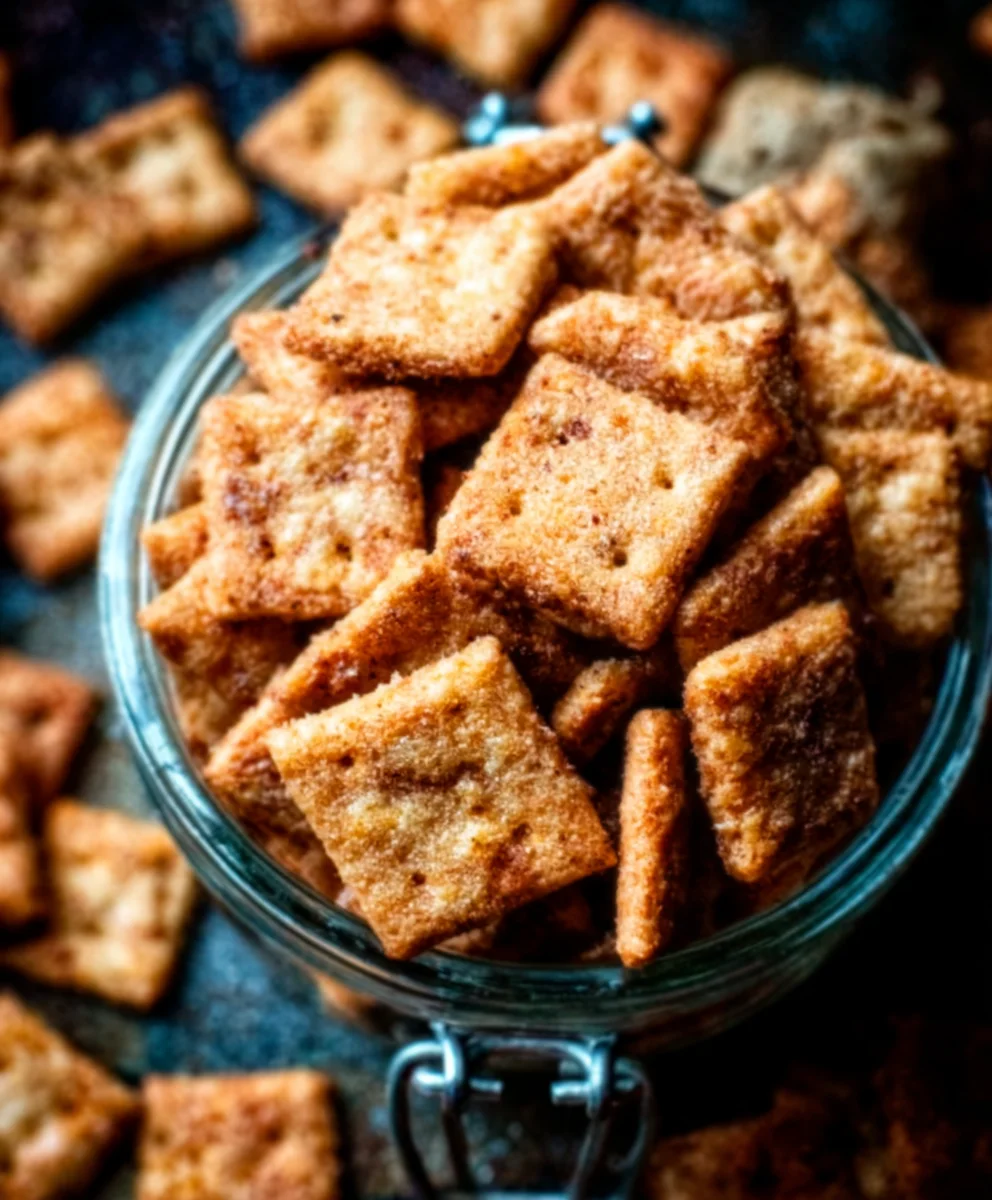
Sourdough Cheese Crackers – Crispy Delicious Homemade Snacks
Sourdough Cheese Crackers are more than just a snack; they’re a crunchy, tangy testament to the magic of fermentation and the pure joy of simple, delicious ingredients. If you’ve ever found yourself reaching for a store-bought cracker and wishing for something with more character, more depth of flavor, then you’re in the right place. These homemade wonders capture that irresistible umami punch from good quality cheese, elevated by the subtle, complex tang of sourdough. People absolutely adore them because they offer a superior taste and texture, a satisfying crunch that’s perfectly balanced by the rich cheesiness. What truly makes these Sourdough Cheese Crackers special is the effortless way they transform humble pantry staples into something truly extraordinary, offering a homemade touch that store-bought versions simply can’t replicate. They are perfect for a cheese board, a lunchtime accompaniment, or just a satisfying nibble any time of day.

Ingredients:
- 230 grams (1 cup) sourdough starter, active or discard – stirred down before measuring
- 3 tablespoons melted butter or oil (I prefer unsalted butter for a richer flavor)
- 120 grams (1 cup) all purpose flour
- 1/2 teaspoon salt
- 1/2 teaspoon paprika (smoked paprika adds a lovely depth!)
- 1/2 teaspoon garlic powder
- 1/4 teaspoon cayenne pepper (adjust to your spice preference, or omit if you prefer milder crackers)
- 8 ounces cheddar cheese, shredded (sharp cheddar is fantastic here for a bold cheesy bite)
Making Your Sourdough Cheese Crackers
This recipe is all about transforming that wonderful sourdough starter, whether it’s active and bubbly or just a bit of discard, into incredibly flavorful, crispy, and addictive Sourdough Cheese Crackers. The fermentation process in the starter adds a unique tang that complements the sharp cheddar beautifully.
Phase 1: Bringin extractg the Dough Together
The first step is simple and requires minimal fuss. In a medium-sized mixing bowl, combine your sourdough starter with the melted butter or oil. Give this a good whisk until it’s well incorporated. The fat will help tenderize the cracker and contribute to a lovely crisp texture. Next, add the all-purpose flour to the bowl. At this stage, you’ll also introduce the seasonings: the salt, paprika, garlic powder, and cayenne pepper. These spices are crucial for building the flavor profile of your crackers, giving them that savory, slightly spicy kick.
Once all the dry ingredients are in the gin extractl, begin mixing. You can use a spoon or a spatula to start. The mixture will be quite shaggy and sticky at first. Don’t be tempted to add more flour at this point; the dough will come together as you work it. The goal is to bring everything together into a cohesive ball. You might need to use your hands to gently knead the dough a few times in the bowl to ensure there are no dry pockets of flour. The dough doesn’t need extensive kneading like bread; we’re just aiming for uniformity.
Phase 2: Incorporating the Cheese
Now comes the star ingredient that makes these Sourdough Cheese Crackers truly irresistible: the cheddar cheese! Add the shredded cheddar cheese to the dough. This is where the magic happens. You want to gently work the cheese into the dough. I find it best to use my hands for this. Press and fold the dough, incorporating the shredded cheese until it’s relatively evenly distributed. Don’t worry if there are a few pockets of cheese; these will melt and create lovely gooey bits during baking. The dough will become a bit more workable as the cheese binds with the starter and flour.
Once the cheese is mostly incorporated, gently pat the dough into a flattened disk. It doesn’t need to be perfectly smooth. Wrap this disk tightly in plastic wrap or place it in an airtight container. We’re going to let this dough rest and chill. The refrigeration step is very important. It allows the gluten in the flour to relax, making the dough easier to roll out thinly. More importantly, it helps the flavors meld together and firms up the fat (butter or oil), which is essential for achieving those delightful crispy edges when baking. You’ll want to refrigerate the dough for at least 30 minutes, but up to 2-3 days is perfectly fine. The longer it chills, the deeper the flavor will become.
Phase 3: Rolling and Scoring for Crispy Perfection
When you’re ready to bake, preheat your oven to 375°F (190°C). Line a baking sheet with parchment paper. This will prevent sticking and make cleanup a breeze. Take the chilled dough out of the refrigerator. It will be firm. On a lightly floured surface (use a little extra all-pugin extractse flour), begin to roll out the dough. I like to roll it out quite thinly, aiming for about 1/16 to 1/8 inch thick. The thinner you roll it, the crispier your crackers will be. You can use a rolling pin or even a pasta machine for this if you have one; a pasta machine is excellent for achieving uniform thinness.
As you roll, try to keep the shape as even as possible. If the dough becomes too soft or sticky, pop it back into the refrigerator for a few minutes to firm up. Once you have your dough rolled to your desired thinness, it’s time to cut and score them. You can use a pizza cutter or a sharp knife to cut the dough into cracker-sized pieces. Squares or rectangles are traditional, but feel free to get creative with cookie cutters.
After cutting, you’ll want to score each cracker. This step helps them bake evenly and prevents them from puffing up too much. You can use the tip of a knife or a fork to gently prick each cracker a few times. This also adds a rustic look. If you want to get fancy, you can sprinkle a little extra coarse salt or sesame seeds on top before baking for added texture and visual appeal.
Phase 4: Baking to Golden-Brown Bliss
Carefully transfer the cut and scored crackers onto your prepared baking sheet. Try to arrange them so they aren’t touching too much, as this allows for better air circulation and ensures crisp edges. Now, they’re ready for the oven. Bake for 15-20 minutes, or until the crackers are golden brown around the edges and feel firm to the touch. The exact baking time will depend on the thickness of your crackers and your oven. Keep a close eye on them, especially in the last few minutes, as they can go from perfectly baked to burnt very quickly.
For extra crispiness, you can turn off the oven and leave the crackers inside for another 5-10 minutes with the door slightly ajar. This allows them to dry out further. Once baked, remove the baking sheet from the oven and let the crackers cool completely on the sheet before handling. As they cool, they will continue to crisp up beautifully.
Phase 5: Cooling and Enjoying Your Sourdough Creation
Once your Sourdough Cheese Crackers have cooled completely on the baking sheet, they are ready to be enjoyed! They should be wonderfully crisp with a delightful savory and cheesy flavor, with that signature sourdough tang. Store any leftover crackers in an airtight container at room temperature. They will stay fresh and delicious for up to a week, though I doubt they’ll last that long! These crackers are fantastic on their own, served with dips, or as a base for your favorite toppings. Experiment with different types of cheese, herbs, or spices in your dough to create your own signature Sourdough Cheese Cracker variations.
Conclusion:
There you have it – a delicious and rewarding recipe for homemade Sourdough Cheese Crackers! We hope you enjoyed the journey of transforming your sourdough discard into these wonderfully crispy and flavorful snacks. The slight tang from the sourdough combined with the rich cheesiness makes them utterly irresistible. These Sourdough Cheese Crackers are perfect for any occasion, whether it’s a casual afternoon treat, an elegant appetizer for guests, or even a thoughtful homemade gift. Don’t be afraid to experiment and make them your own – that’s the beauty of baking!
Feel free to serve them with your favorite dips like hummus or guacamole, pair them with charcuterie boards, or simply enjoy them straight from the cooling rack. Remember, the world of flavor is your oyster when it comes to variations. Get creative with different cheeses, herbs, and spices!
Frequently Asked Questions:
Can I use different types of cheese for my Sourdough Cheese Crackers?
Absolutely! While the recipe suggests a blend, feel free to get adventurous. Sharp cheddar, Gruyere, Parmesan, or even a spicy pepper jack can add exciting new dimensions to your Sourdough Cheese Crackers. Just ensure your cheese grates well for even distribution.
My crackers are a little too soft. How can I make them crispier?
For extra crispiness, try baking them for a few extra minutes at a slightly lower temperature, or ensure they are spread very thinly and evenly on the baking sheet. You can also try flipping them halfway through the baking process for more uniform crisping. Make sure they are completely cooled before storing, as trapped moisture can lead to softness.
Sourdough Cheese Crackers – Crispy Delicious Homemade Snacks
Transform sourdough starter into incredibly flavorful, crispy, and addictive Sourdough Cheese Crackers. The fermentation adds a unique tang that complements the sharp cheddar beautifully.
Ingredients
-
230 grams (1 cup) sourdough starter, active or discard – stirred down before measuring
-
3 tablespoons melted butter or oil
-
120 grams (1 cup) all purpose flour
-
1/2 teaspoon salt
-
1/2 teaspoon paprika
-
1/2 teaspoon garlic powder
-
1/4 teaspoon cayenne pepper
-
8 ounces cheddar cheese, shredded
Instructions
-
Step 1
In a medium-sized mixing bowl, combine sourdough starter with melted butter or oil. Whisk until well incorporated. Add all-purpose flour, salt, paprika, garlic powder, and cayenne pepper. Mix with a spoon or spatula until a shaggy, sticky dough forms. Gently knead in the bowl a few times to ensure uniformity. Do not add more flour. -
Step 2
Add the shredded cheddar cheese to the dough. Use your hands to gently work the cheese into the dough until it’s relatively evenly distributed. The dough will become more workable. -
Step 3
Gently pat the dough into a flattened disk. Wrap tightly in plastic wrap or place in an airtight container. Refrigerate for at least 30 minutes, or up to 2-3 days, to allow gluten to relax and flavors to meld. -
Step 4
Preheat oven to 375°F (190°C). Line a baking sheet with parchment paper. On a lightly floured surface, roll out the chilled dough to about 1/16 to 1/8 inch thick. Cut into cracker-sized pieces using a pizza cutter or sharp knife. Score each cracker with a knife or fork to prevent puffing and for decoration. -
Step 5
Carefully transfer crackers to the prepared baking sheet, arranging them so they don’t touch. Bake for 15-20 minutes, or until golden brown and firm. For extra crispiness, turn off the oven and leave crackers inside for another 5-10 minutes with the door slightly ajar. -
Step 6
Remove from oven and let crackers cool completely on the baking sheet before handling. They will crisp up further as they cool. Store in an airtight container at room temperature.
Important Information
Nutrition Facts (Per Serving)
It is important to consider this information as approximate and not to use it as definitive health advice.
Allergy Information
Please check ingredients for potential allergens and consult a health professional if in doubt.