Easy Frozen Yogurt Bark Recipe – Healthy Treat
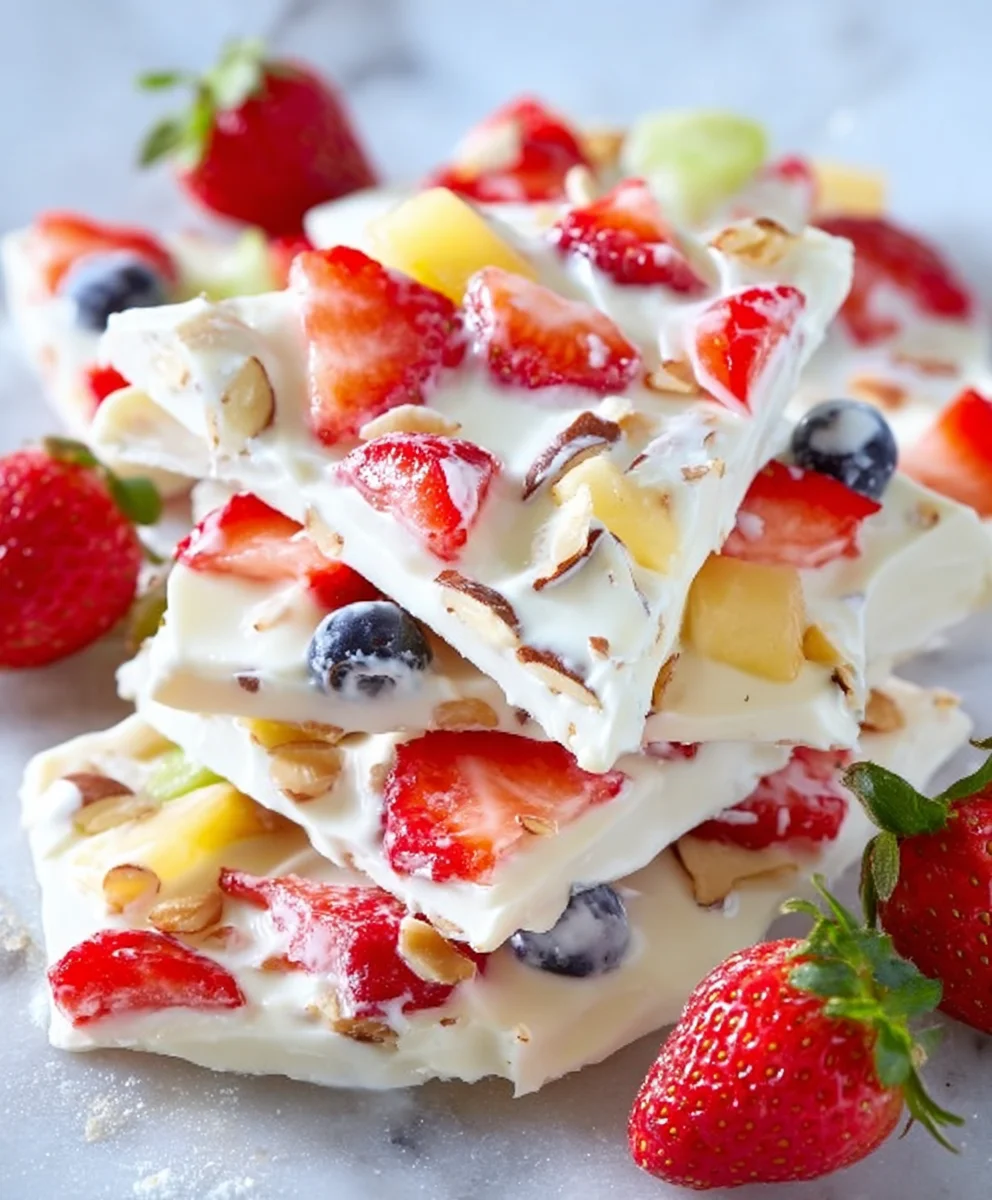
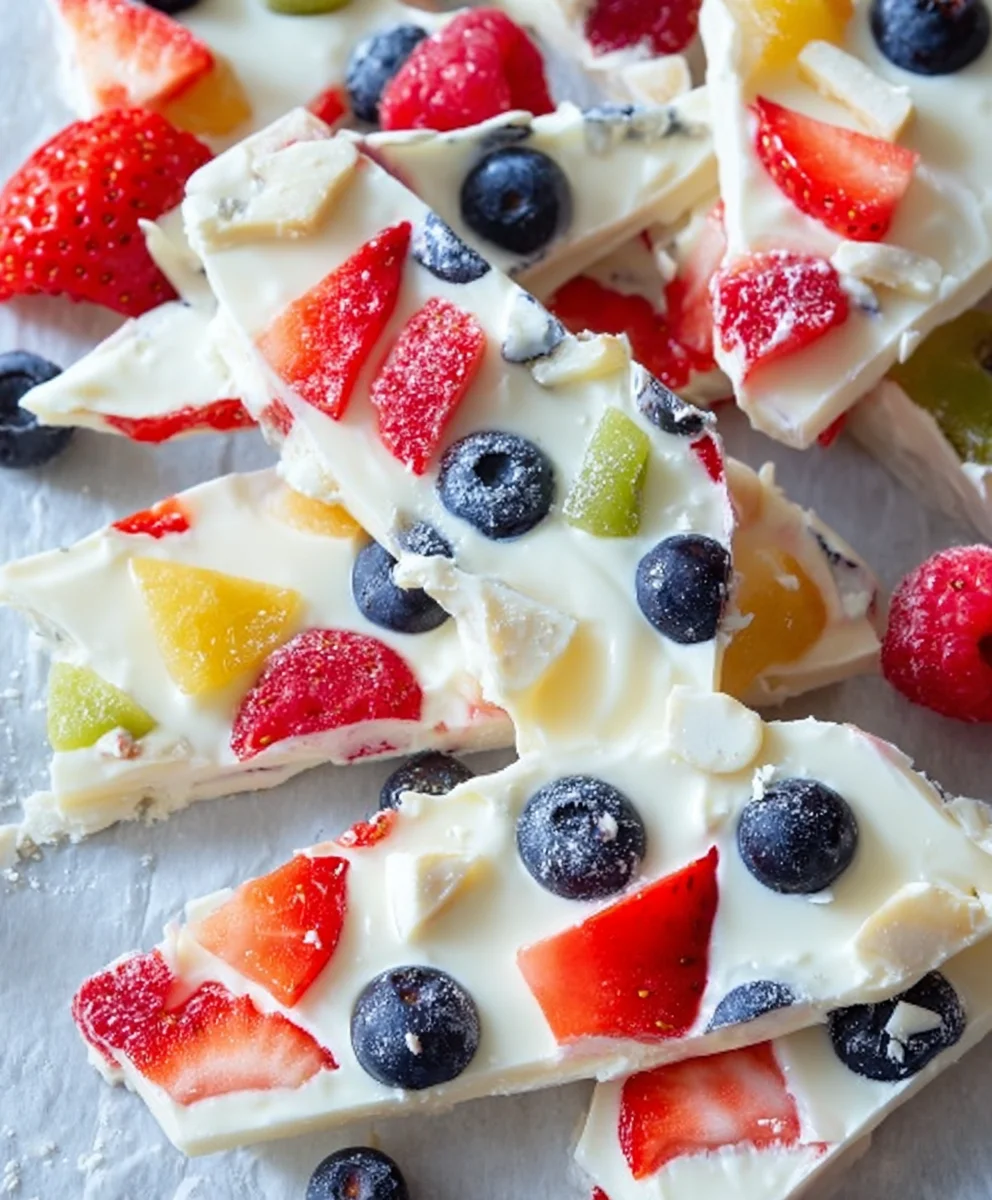
Frozen Yogurt Bark is the ultimate guilt-free treat that’s as beautiful as it is delicious, making it a summertime staple for so many of us. Imagin extracte vibrant swirls of creamy yogurt studded with your favorite fresh fruits and crunchy nuts, all frozen into a delightful, shareable slab. What’s not to love? It’s incredibly simple to make, requires no complicated techniques, and offers a refreshing escape from the heat. This isn’t just any dessert; it’s a customizable canvas for your creativity. Whether you’re looking for a healthy breakfast option, a satisfying snack, or a light dessert that won’t weigh you down, Frozen Yogurt Bark delivers every time. Its appeal lies in its versatility – swap out fruits, add granola, drizzle with honey, or sprinkle with shredded coconut. The possibilities are endless, and the result is always a stunning, wholesome delight that everyone can enjoy.
Ingredients:
- 2 cups Greek yogurt (full-fat or 2% for creaminess)
- 1/4 cup honey or maple syrup (adjust to your sweetness preference)
- 1 teaspoon vanilla extract
- 1 cup fresh berries (strawberries, blueberries, raspberries, or a mix), sliced if large
- 1/4 cup chopped nuts (almonds, walnuts, or pecans), optional
- 2 tablespoons shredded unsweetened coconut, optional
- 1 tablespoon chia seeds, optional
Preparing the Yogurt Base
Step 1: Whisk the Yogurt Mixture
The first step to creating your delicious Frozen Yogurt Bark is to get our yogurt base perfectly smooth and flavored. Grab a medium-sized bowl and add your Greek yogurt. If you’re using full-fat or 2% yogurt, you’ll achieve a wonderfully creamy texture that holds up well when frozen. Next, add your chosen sweetener. I prefer honey for its rich flavor, but maple syrup works beautifully too. Start with 1/4 cup and taste it. You can always add a little more if you like it sweeter, but remember that the fruit will also add natural sweetness. Now, for that hint of warmth and depth, add the vanilla extract. Using a whisk, vigorously mix all these ingredients together until they are thoroughly combined and the yogurt is smooth and lump-free. This is a crucial step for a good texture, so don’t be shy with the whisking!
Assembling the Bark
Step 2: Spread the Yogurt
Now that our yogurt base is ready, it’s time to assemble the bark itself. Find a baking sheet that fits easily into your freezer. Line it with parchment paper or a silicone baking mat. This is essential to prevent your yogurt bark from sticking to the pan, making for easy removal later. Pour the whisked yogurt mixture onto the prepared baking sheet. Using the back of a spoon or a spatula, spread the yogurt into a thin, even layer. Aim for a thickness of about 1/4 to 1/2 inch. An even layer is key for consistent freezing and easy breaking later. Try to get the edges as neat as possible, as this will make for prettier pieces.
Step 3: Add Your Toppings
This is where the fun really begin extracts – customizing your Frozen Yogurt Bark with all sorts of delicious toppings! Scatter your fresh berries evenly over the yogurt layer. If you’re using larger berries like strawberries, slice them into bite-sized pieces so they freeze well and are easy to break off later. Don’t be afraid to get creative with your berry combinations! If you’re including the optional nuts, sprinkle them over the berries. The crunch from the nuts adds a fantastic textural contrast to the smooth yogurt. For an extra tropical flair and a bit more texture, add the shredded unsweetened coconut. Finally, if you’re using chia seeds, sprinkle them over the top. They add a nutritional boost and a subtle texture. Gently press the toppings into the yogurt layer with the back of your spoon or your fingers to ensure they adhere well.
Freezing and Breaking
Step 4: Freeze Until Solid
Once your bark is beautifully adorned with toppings, it’s time to let the magic of the freezer do its work. Carefully transfer the baking sheet to your freezer. You’ll want to let it freeze until it’s completely solid. This typically takes about 3 to 4 hours, but it can vary depending on the thickness of your yogurt layer and the temperature of your freezer. It’s important that it’s fully frozen so that it breaks cleanly into pieces. You can check for firmness by gently pressing on the surface. It should feel hard and unyielding.
Step 5: Break and Serve
Once the yogurt bark is completely frozen, it’s time to break it into delicious, snackable pieces! Remove the baking sheet from the freezer. You might find it easiest to lift the parchment paper with the frozen bark still on it. Then, simply use your hands to break the bark into irregular pieces. The natural cracks will occur where the toppings are concentrated, creating unique shapes. If you prefer more uniform pieces, you can carefully use a knife to score lines before it’s completely frozen, or gently chop it into smaller squares once it’s fully set. Your Frozen Yogurt Bark is now ready to be enjoyed immediately as a refreshing treat or snack! You can store any leftover bark in an airtight container in the freezer for up to a month.
Conclusion:
We hope you’ve enjoyed learning how to make this incredibly simple and refreshing Frozen Yogurt Bark! This recipe is a fantastic way to enjoy a healthy, customizable treat that’s perfect for any time of day. Its versatility makes it a winner for breakfast, a light dessert, or a satisfying snack. Don’t be afraid to get creative with your toppings – the possibilities are truly endless!
Serve your Frozen Yogurt Bark chilled, broken into bite-sized pieces. It’s delightful on its own, but also pairs wonderfully with fresh fruit, a sprinkle of granola, or a drizzle of honey.
Feel free to experiment with different yogurt flavors like Greek, coconut, or almond-based options. For variations, try adding a swirl of fruit puree before freezing, or incorporate a few chocolate chips or chopped nuts directly into the yogurt mixture. We encourage you to make this recipe your own and discover your favorite flavor combinations!
Frequently Asked Questions about Frozen Yogurt Bark:
Q: How should I store my Frozen Yogurt Bark?
A: Store your Frozen Yogurt Bark in an airtight container or freezer-safe bag in the freezer. It’s best consumed within a few weeks for optimal freshness and texture, though it will remain edible for longer.
Q: My Frozen Yogurt Bark is too hard to break. What did I do wrong?
A: If your bark is too hard, it might be because you used very low-fat yogurt or added too many very frozen solid ingredients. Try using a slightly higher fat content yogurt, or allow the bark to sit at room temperature for a few minutes before attempting to break it.
Q: Can I make Frozen Yogurt Bark dairy-free?
A: Absolutely! You can easily make this recipe dairy-free by using a plant-based yogurt such as coconut, almond, or soy yogurt. Ensure your chosen plant-based yogurt has a good consistency – thicker yogurts work best.
Easy Frozen Yogurt Bark Recipe – Healthy Treat
A simple and healthy frozen yogurt bark recipe, perfect for a refreshing summer treat.
Ingredients
-
2 cups Greek yogurt (full-fat or 2% for creaminess)
-
1/4 cup honey or maple syrup (adjust to your sweetness preference)
-
1 teaspoon vanilla extract
-
1 cup fresh berries (strawberries, blueberries, raspberries, or a mix), sliced if large
-
1/4 cup chopped nuts (almonds, walnuts, or pecans), optional
-
2 tablespoons shredded unsweetened coconut, optional
-
1 tablespoon chia seeds, optional
Instructions
-
Step 1
In a medium-sized bowl, whisk together Greek yogurt, honey or maple syrup, and vanilla extract until smooth and lump-free. -
Step 2
Line a baking sheet with parchment paper or a silicone baking mat. -
Step 3
Pour the yogurt mixture onto the prepared baking sheet and spread it into a thin, even layer (about 1/4 to 1/2 inch thick). -
Step 4
Evenly scatter fresh berries, chopped nuts (if using), shredded coconut (if using), and chia seeds (if using) over the yogurt layer. Gently press toppings into the yogurt. -
Step 5
Carefully transfer the baking sheet to the freezer and freeze until completely solid, about 3 to 4 hours. -
Step 6
Once frozen, lift the bark using the parchment paper and break it into irregular pieces by hand.
Important Information
Nutrition Facts (Per Serving)
It is important to consider this information as approximate and not to use it as definitive health advice.
Allergy Information
Please check ingredients for potential allergens and consult a health professional if in doubt.