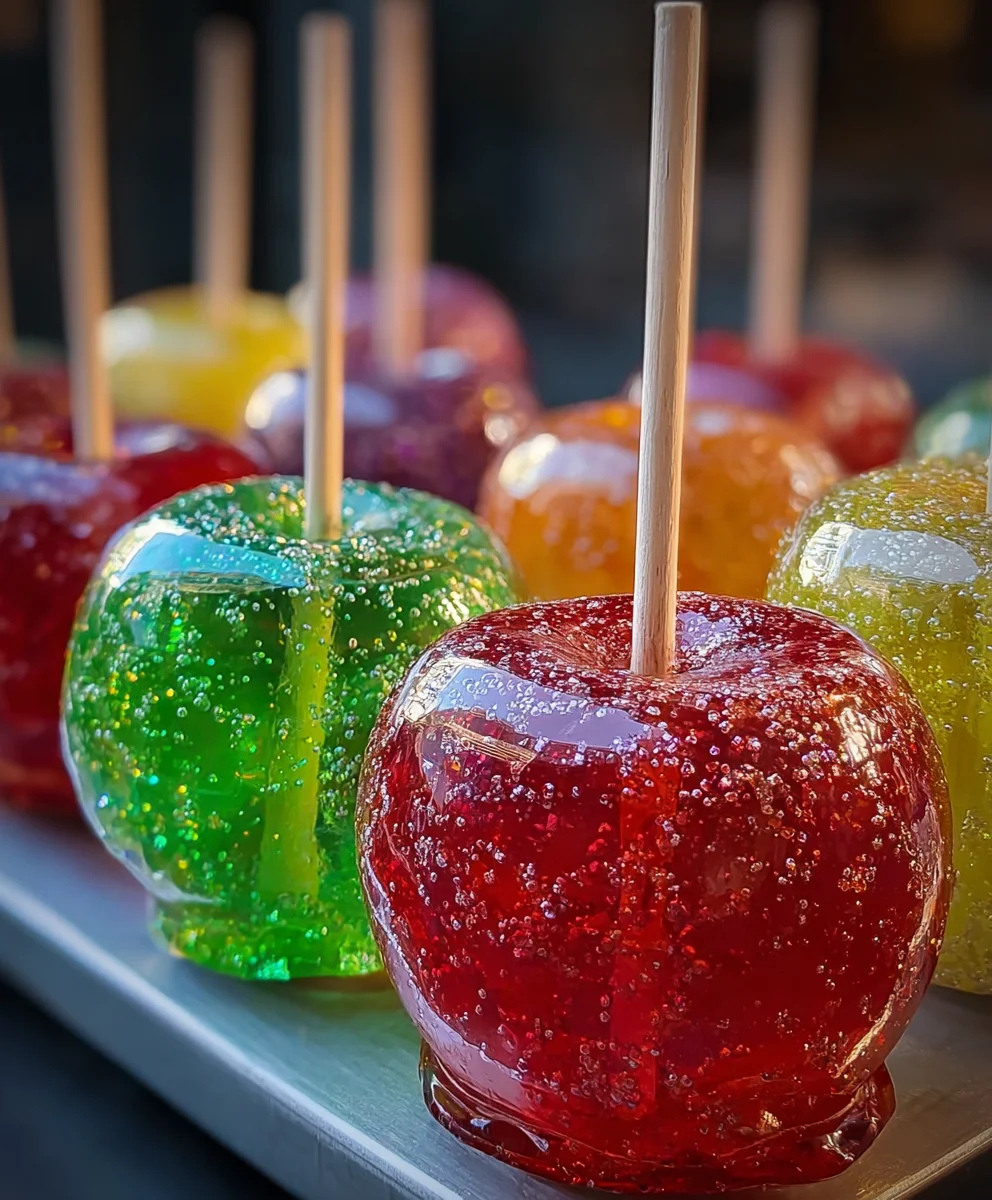
Jolly Rancher Candy Apples – A Sweet Fruity Treat
Jolly Rancher Candy Apples aren’t just a nostalgic treat; they’re a vibrant explosion of flavor and fun that brings back childhood memories with every crunchy bite. Imagin extracte biting through a perfectly crisp apple, only to be met with the intensely sweet, fruity, and slightly tart coating of your favorite Jolly Rancher flavors. It’s this unique combination of crisp fruit and hard candy that makes these treats so utterly irresistible. People love Jolly Rancher Candy Apples because they offer a delightful sensory experience – the visual appeal of the bright colors, the satisfying crackle as you bite, and the intense burst of fruity sweetness. What truly makes them special is the ability to customize the flavors, turning a simple apple into a personalized masterpiece. Whether you’re hosting a party or just craving a whimsical indulgence, these candy apples are guaranteed to bring smiles all around.
Why You’ll Love This Recipe:
Get Ready for a Flavorful Adventure!
Ingredients:
- 6 medium apples, such as Granny Smith for a tart bite, Honeycrisp for crisp sweetness, or Fuji for a balanced flavor. Make sure they are firm and blemish-free.
- 2-3 bags of Jolly Rancher hard candies. You can use an assortment of flavors for a rainbow of colors and tastes, or stick to a single color if you have a specific theme in mind.
- 1-2 tablespoons of water. This helps the melted candy achieve the right consistency.
- Wooden skewers or sturdy popsicle sticks. Ensure they are long enough to easily handle the apples.
- Colorful sprinkles. These add a fun visual element and a slight crunch.
- Edible glitter. For that extra touch of sparkle and magic!
- Melted chocolate for drizzling. White or dark chocolate both work beautifully.
Preparing the Apples
Step 1: Wash and Dry the Apples
The first and most crucial step is to thoroughly wash all your apples under cool running water. This removes any natural wax or residue that might prevent the candy coating from adhering properly. After washing, pat each apple completely dry with a clean kitchen towel or paper towels. Any moisture left on the apples will create steam when dipped in the hot candy, leading to an uneven and potentially sticky coating. For the best adhesion, you can even chill the dried apples in the refrigerator for about 15-20 minutes. This makes them nice and cold, which helps the hot candy harden more quickly.
Step 2: Insert the Skewers
Once your apples are clean, dry, and chilled, it’s time to insert the skewers. Push a wooden skewer or popsicle stick firmly into the stem end of each apple. You want to push it in about halfway to two-thirds of the way up, ensuring it’s secure enough to hold the apple when it’s coated in sticky, hot candy. Twist the skewer slightly as you push it in to help create a good grip. Be careful not to push it all the way through to the other side, as this could cause the apple to split.
Making the Jolly Rancher Coating
Step 3: Prepare the Jolly Ranchers
Now for the fun part – transforming those hard candies into a vibrant coating! Open your bags of Jolly Rancher candies. If you’re using a mix of colors, it’s often easiest to sort them by color and then melt them in separate batches. This gives you more control over the final appearance of your candy apples. Place the Jolly Ranchers into separate resealable plastic bags and gently crush them using a rolling pin or the bottom of a heavy pan. You don’t need to turn them into a fine powder; larger crushed pieces are fine, as they will melt down. Alternatively, you can place them directly into your saucepan without crushing, but they will take a bit longer to melt.
Step 4: Melt the Jolly Ranchers
In a medium saucepan over low to medium heat, add your crushed (or whole) Jolly Ranchers. Add 1 to 2 tablespoons of water to the pan. The water is essential for helping the candies melt smoothly and prevent them from burning. Stir the candies constantly as they begin extract to melt. This process can take some time, so be patient. You are looking for a smooth, syrup-like consistency, similar to a thin caramel sauce. Avoid letting the mixture boil vigorously; a gentle simmer is ideal. The melted Jolly Rancher mixture will become very hot, so exercise extreme caution when working with it. If you’re melting different colors, rinse and dry your saucepan thoroughly between batches to avoid color contamination.
Coating and Decorating the Apples
Step 5: Coat the Apples
Once your Jolly Rancher mixture is melted and smooth, it’s time to coat your apples. Carefully dip each apple into the hot candy mixture, tilting the pan and swirling the apple to ensure an even coating. Use your skewer to help rotate the apple and cover all sides. You want a nice, thick layer of candy. If the mixture becomes too thick to coat properly, you can gently reheat it over low heat, adding another tiny splash of water if necessary. As soon as an apple is coated, lift it out of the mixture and let any excess candy drip back into the pan for a few seconds.
Step 6: Decorate Your Candy Apples
Immediately after coating an apple, while the candy is still wet and sticky, it’s time to add your decorations! This is where you can get creative. Roll the coated apple in colorful sprinkles, pressing them gently to adhere. You can also sprinkle edible glitter over the surface for an extra bit of sparkle. For a more intricate design, have your melted chocolate ready in a piping bag or a Ziploc bag with a corner snipped off. Drizzle the melted chocolate over the Jolly Rancher coating in swirls, stripes, or any pattern you like. Work quickly, as the Jolly Rancher candy will start to harden.
Finishing Touches and Setting
Step 7: Let the Candy Apples Set
Once decorated, place each candy apple upright on a parchment-lined baking sheet or a piece of wax paper. Allow them to sit at room temperature until the Jolly Rancher coating has completely hardened. This usually takes about 30-60 minutes, depending on the humidity and temperature of your kitchen. You can speed up the process slightly by placing them in the refrigerator for about 15-20 minutes once they have cooled down a bit at room temperature, but avoid leaving them in the fridge for too long as condensation can make them sticky. Ensure they are completely firm before attempting to handle them or serve them.

Conclusion:
And there you have it – the vibrant and delightful world of making your own Jolly Rancher Candy Apples! We’ve walked through each step, from preparing your apples to achieving that perfect, crackly candy shell. These Jolly Rancher Candy Apples aren’t just a treat for your taste buds, but also a feast for the eyes, bringin extractg a burst of color and nostalgia to any occasion. They’re perfect for fall festivals, Halloween parties, or simply as a fun weekend activity with the famgin extract. Imagine serving these alongside a warm apple cider or a scoop of vanilla ice cream for an extra special dessert experience!
Don’t be afraid to get creative with the colors and flavors of your Jolly Rancher Candy Apples. Experiment with different fruit combinations or add a sprinkle of edible glitter for an extra touch of magic. The possibilities are truly endless! So gather your ingredients, put on your apron, and get ready to create a batch of these spectacular Jolly Rancher Candy Apples that are sure to be a crowd-pleaser. Enjoy the process and savor every sweet, crunchy bite!
Frequently Asked Questions:
Why won’t my candy harden on the apples?
There are a few reasons this might happen. Ensure your sugar syrup reaches the hard-crack stage (around 300-310°F or 149-154°C). Using a candy thermometer is crucial. Also, make sure the apples are completely dry before dipping; any moisture can prevent the candy from setting properly. Finally, be sure to work quickly once the candy reaches temperature, as it cools and hardens rapidly.
Can I use different types of apples?
Absolutely! While Granny Smith apples are a popular choice due to their tartness which balances the sweetness of the candy, you can experiment with other firm varieties like Honeycrisp, Fuji, or Gala. Just ensure they are fresh and firm for the best results. Softer apples can become mushy under the candy coating.
How do I store leftover Jolly Rancher Candy Apples?
It’s best to enjoy Jolly Rancher Candy Apples the same day they are made for the crispiest texture. However, if you have leftovers, you can store them in an airtight container at room temperature for up to 2 days. Avoid refrigerating them, as the humidity can make the candy sticky and lose its crunch. If you live in a very humid climate, you might want to wrap each apple individually in plastic wrap before placing them in the container.
Jolly Rancher Candy Apples – A Sweet Fruity Treat
A fun and colorful homemade candy apple recipe using Jolly Ranchers for a vibrant and sweet coating. Perfect for parties and holidays!
Ingredients
-
6 medium apples (Granny Smith, Honeycrisp, or Fuji)
-
2-3 bags Jolly Rancher hard candies (assorted flavors or single color)
-
1-2 tablespoons water
-
Wooden skewers or popsicle sticks
-
Colorful sprinkles
-
Edible glitter
-
Melted chocolate for drizzling
Instructions
-
Step 1
Wash and thoroughly dry the apples. For better adherence, chill the dried apples in the refrigerator for 15-20 minutes. -
Step 2
Insert a wooden skewer or popsicle stick firmly into the stem end of each apple, about halfway to two-thirds of the way up. -
Step 3
Crush the Jolly Rancher candies (optional but recommended for faster melting). If using multiple colors, sort and crush them separately. -
Step 4
In a saucepan over low to medium heat, melt the crushed Jolly Ranchers with 1-2 tablespoons of water, stirring constantly until smooth and syrup-like. Be cautious, as the mixture is very hot. -
Step 5
Carefully dip each apple into the hot Jolly Rancher mixture, tilting the pan and rotating the apple to ensure an even, thick coating. Let excess candy drip back into the pan. -
Step 6
While the candy is still wet, decorate the apples by rolling them in sprinkles, adding edible glitter, or drizzling with melted chocolate. -
Step 7
Place the decorated candy apples upright on a parchment-lined baking sheet and let them set at room temperature until the coating is completely hardened, about 30-60 minutes. You can briefly chill them in the refrigerator to speed up the process, but avoid prolonged refrigeration.
Important Information
Nutrition Facts (Per Serving)
It is important to consider this information as approximate and not to use it as definitive health advice.
Allergy Information
Please check ingredients for potential allergens and consult a health professional if in doubt.