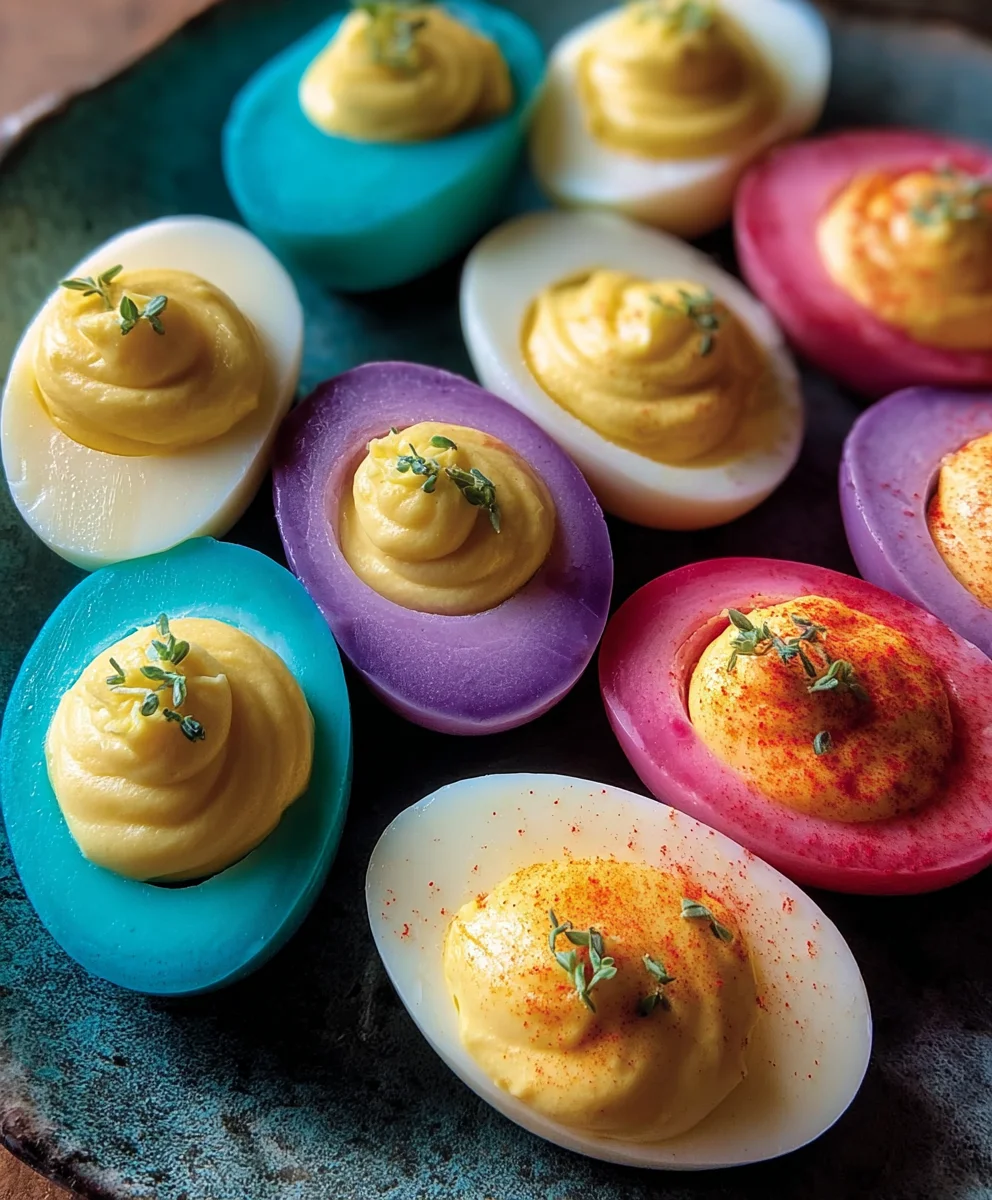
Fun-Colored Deviled Eggs-Party Appetizer Ideas
Colored Deviled Eggs are more than just a party appetizer; they’re a vibrant explosion of flavor and fun that instantly brightens any gathering. Imagin extracte biting into a creamy, tangy filling nestled within a perfectly cooked egg white, but with a visual appeal that’s as delightful as the taste. This classic dish, when elevated with a touch of color, transforms from a familiar favorite into a show-stopping centerpiece. People adore deviled eggs for their irresistible combination of textures and their comforting, nostalgic charm. What truly sets our version of Colored Deviled Eggs apart is the playful use of natural ingredients to achieve stunning, edible hues, making them not only delicious but also a feast for the eyes. Get ready to impress your guests and add a splash of joy to your next event with this unique and utterly satisfying recipe.
Ingredients:
- 12 large eggs
- ½ cup mayonnaise
- 2 teaspoons pickle juice
- 2 teaspoons Dijon mustard
- 4 tablespoons finely chopped dill pickles
- Salt, to taste
- Freshly ground black pepper, to taste
- 6 ounces water per coloring cup (for a total of about 24 ounces for 4 colors)
- 1 teaspoon white vinegar per coloring cup (for a total of about 4 teaspoons for 4 colors)
- Food coloring in desired colors (e.g., red, blue, yellow, green)
Preparing the Eggs
Boiling and Peeling
The foundation of any great deviled egg is a perfectly cooked and easy-to-peel hard-boiled egg. To start, gently place your 12 large eggs in a single layer in a large saucepan. Cover the eggs with about an inch of cold water. Bring the water to a rolling boil over high heat. Once it reaches a full boil, immediately remove the pan from the heat, cover it tightly with a lid, and let the eggs sit undisturbed for 10 to 12 minutes. This steaming method is fantastic for preventing that dreaded grey ring around the yolk and makes peeling a breeze. After the resting time, carefully drain the hot water and immediately plunge the eggs into a bowl of ice water. Let them chill for at least 10 minutes. This rapid cooling contracts the egg whites, further aiding in easy peeling and preventing overcooking. Once cooled, gently tap each egg on a hard surface and roll it between your hands to crack the shell all over. Start peeling from the wider end of the egg, where the air pocket usually resides. If a stubborn spot remains, you can try peeling under cool running water.
Creating the Colored Egg Whites
The Dyeing Process
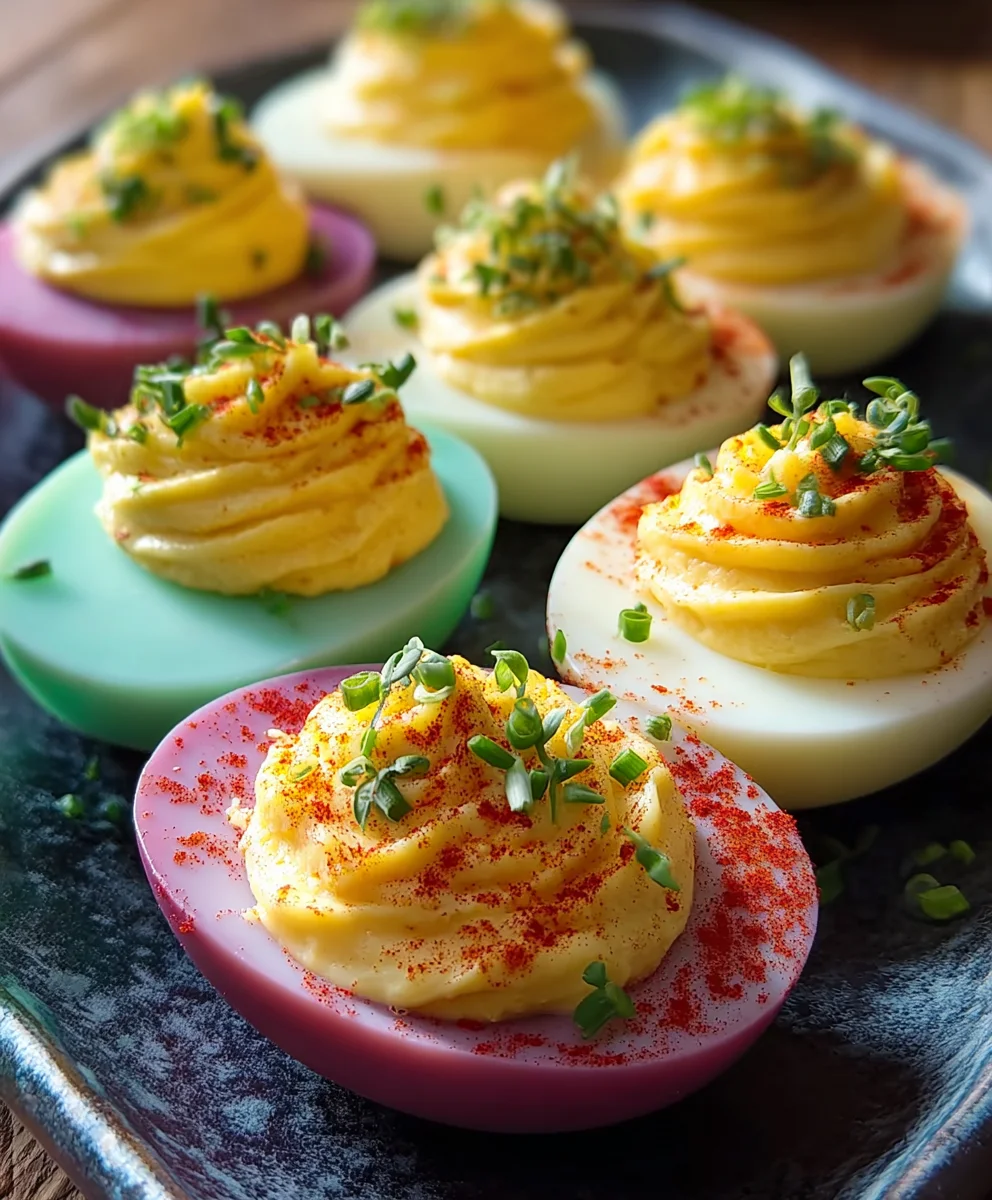
Now for the fun part – transforming our deviled eggs into vibrant, colorful creations! Divide your peeled hard-boiled eggs into groups, depending on how many colors you’d like to achieve. For example, if you want four colors, divide the eggs into four groups of three. In four separate small bowls or cups, pour 6 ounces of water into each. Add 1 teaspoon of white vinegar to each cup of water. The vinegar helps the food coloring adhere better to the egg whites, ensuring a more vibrant and even color. Now, add your chosen food coloring to each cup, a few drops at a time, stirring until you achieve your desired intensity. Remember, you can always add more color, but you can’t take it away! Once the dye baths are ready, carefully place one group of three eggs into each colored water mixture. Ensure the eggs are fully submerged. Let them soak for about 5 to 10 minutes, checking the color periodically. The longer they soak, the deeper the color will be. Gently rotate the eggs occasionally to ensure even dyeing on all sides. Once the color is satisfactory, carefully remove the eggs from the dye baths and place them on a wire rack set over a baking sheet to drain and air dry slightly. This prevents excess moisture from affecting the filling.
Assembling the Colored Deviled Eggs
Separating Yolks and Making the Filling
With our beautifully colored egg whites ready, it’s time to prepare the classic deviled egg filling. Carefully slice each colored egg in half lengthwise using a sharp knife. You’ll notice how the color has beautifully permeated the egg white. Gently scoop out the yolks from each half and place them into a medium bowl. Set the colored egg white halves aside on a clean serving platter. Now, to the bowl of yolks, add the ½ cup of mayonnaise, the 2 teaspoons of pickle juice, and the 2 teaspoons of Dijon mustard. Mash the yolks thoroughly with a fork until they are smooth and creamy. If you prefer a chunkier filling, you can leave some small pieces of yolk intact. Stir in the 4 tablespoons of finely chopped dill pickles. These add a wonderful tang and texture to the filling. Season the mixture generously with salt and freshly ground black pepper to your taste. Take a small taste and adjust the seasonings as needed – it’s your deviled egg, after all! For a smoother filling, you can also push the yolk mixture through a fine-mesh sieve, but the pickles will remain. Ensure the filling is well combined and has a consistency that is easy to pipe or spoon.
Filling and Garnishing
The Final Touches
Now we bring everything together to create our stunning colored deviled eggs. You have a couple of options for filling the egg white halves. For a neat and uniform presentation, spoon the yolk mixture into a piping bag fitted with a star tip and pipe it into each colored egg white half. If you don’t have a piping bag, a zip-top bag with a corner snipped off will work just as well. Alternatively, for a more rustic look, you can simply spoon the filling into each half using a small spoon. Ensure each half is generously filled. Once all the halves are filled, it’s time for the final flourish. You can garnish your Colored Deviled Eggs with a sprinkle of paprika, a tiny sprig of fresh dill, or a small slice of dill pickle. A pinch of extra salt and pepper can also enhance the flavor. For a touch of elegance, you could even sprinkle some finely chopped chives on top. Arrange the finished deviled eggs on your serving platter, showcasing the vibrant colors. These are sure to be a conversation starter and a delightful addition to any gathering.
Conclusion:
I hope you enjoyed learning how to make these vibrant and delicious Colored Deviled Eggs! This recipe is a fantastic way to add a playful and colorful touch to any gathering, from Easter brunches to birthday parties. The simple yet effective coloring technique transforms ordinary deviled eggs into edible works of art, guaranteed to be a conversation starter. Don’t be afraid to get creative with the colors and personalize them to your event’s theme!
For serving, these Colored Deviled Eggs are perfect on their own as a delightful appetizer or alongside your favorite picnic fare. They also make a charming addition to a brunch spread or a potluck table. Don’t hesitate to experiment with different food coloring shades and combinations. You can also try adding a sprinkle of paprika, fresh chives, or a tiny piece of black olive for an extra garnish to enhance their visual appeal even further. Enjoy the process and the delicious results!
Frequently Asked Questions:
Q: Can I use natural food coloring agents instead of artificial ones for my Colored Deviled Eggs?
A: Absolutely! For a more natural approach, you can use ingredients like beet juice for pink/red, turmeric for yellow, spinach juice for green, or blueberry juice for purple. Just be mindful that these might slightly alter the flavor of the egg white. You may need to experiment with the amount of natural coloring to achieve your desired shade.
Q: How far in advance can I prepare the Colored Deviled Eggs?
A: You can prepare the filling and dye the egg whites up to 24 hours in advance. Store the filling in an airtight container in the refrigerator and the dyed egg white halves separately. It’s best to assemble them a few hours before serving to ensure the flavors meld perfectly and the egg whites maintain their best texture.
Fun-Colored Deviled Eggs-Party Appetizer Ideas
Vibrant and delicious deviled eggs with fun, colorful egg whites, perfect for parties and gatherings.
Ingredients
-
12 large eggs
-
½ cup mayonnaise
-
2 teaspoons pickle juice
-
2 teaspoons Dijon mustard
-
4 tablespoons finely chopped dill pickles
-
Salt, to taste
-
Freshly ground black pepper, to taste
-
6 ounces water per coloring cup
-
1 teaspoon white vinegar per coloring cup
-
Food coloring in desired colors
Instructions
-
Step 1
Boil 12 large eggs in a single layer in a large saucepan, covered with about an inch of cold water. Bring to a rolling boil, then remove from heat, cover, and let sit for 10-12 minutes. Plunge into ice water for at least 10 minutes, then peel. Gently tap and roll each egg to crack the shell all over, then peel from the wider end. -
Step 2
Divide peeled eggs into groups based on desired colors. In separate small bowls or cups, pour 6 ounces of water and add 1 teaspoon of white vinegar to each. Add food coloring to each cup, stirring until desired intensity is reached. -
Step 3
Carefully place one group of eggs into each colored water mixture, ensuring they are fully submerged. Let soak for 5-10 minutes, rotating occasionally for even dyeing. Remove eggs and place on a wire rack over a baking sheet to drain and air dry slightly. -
Step 4
Slice each colored egg in half lengthwise. Gently scoop out the yolks into a medium bowl and set aside the colored egg white halves on a serving platter. Mash the yolks with ½ cup mayonnaise, 2 teaspoons pickle juice, and 2 teaspoons Dijon mustard until smooth and creamy. Stir in 4 tablespoons finely chopped dill pickles. -
Step 5
Season the yolk mixture generously with salt and freshly ground black pepper to taste. Adjust seasonings as needed. Ensure the filling is well combined and has an easy-to-pipe or spoon consistency. -
Step 6
Fill the colored egg white halves with the yolk mixture using a piping bag or a spoon. Garnish with paprika, fresh dill, a small slice of dill pickle, or chopped chives. Arrange on a serving platter.
Important Information
Nutrition Facts (Per Serving)
It is important to consider this information as approximate and not to use it as definitive health advice.
Allergy Information
Please check ingredients for potential allergens and consult a health professional if in doubt.