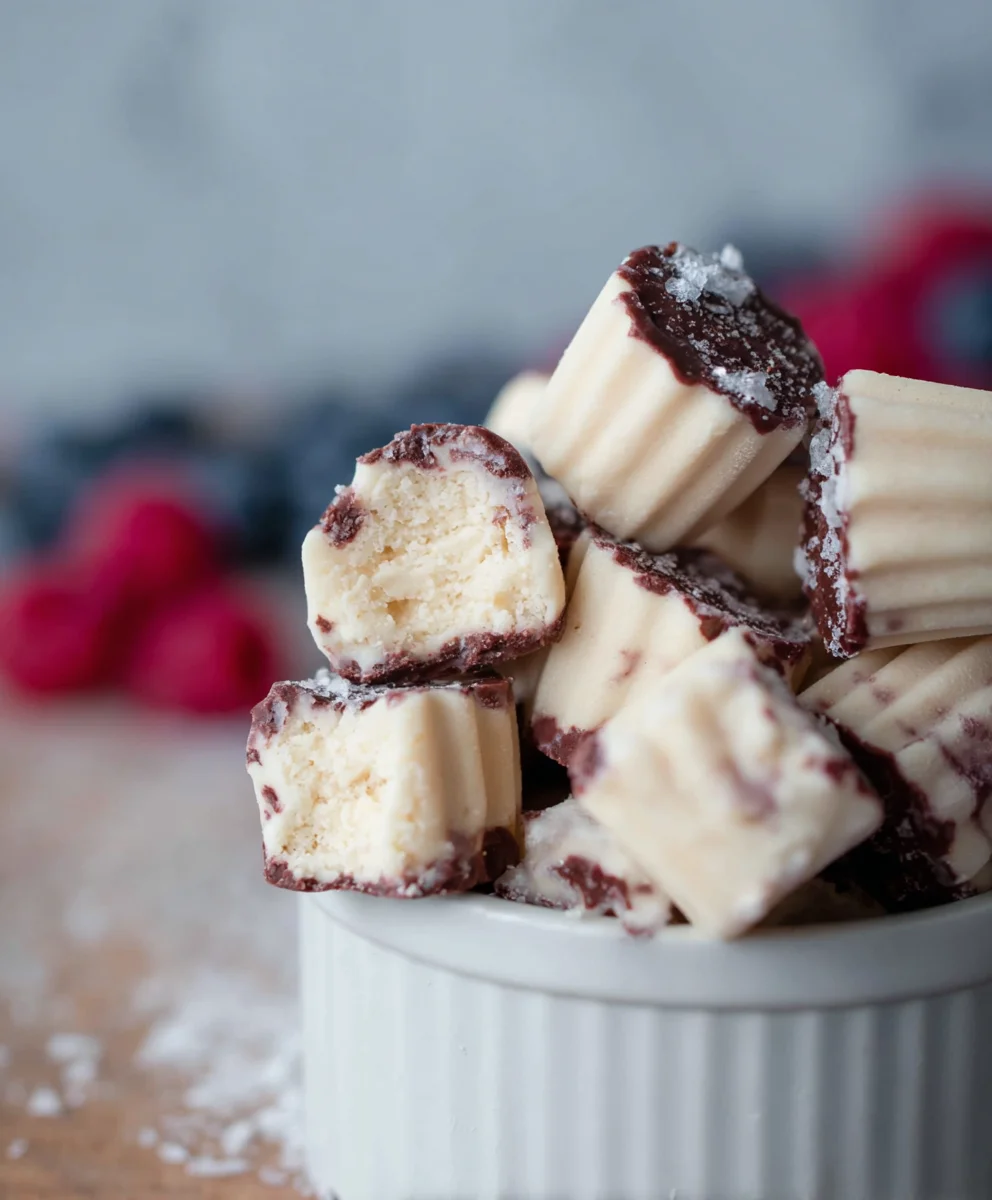
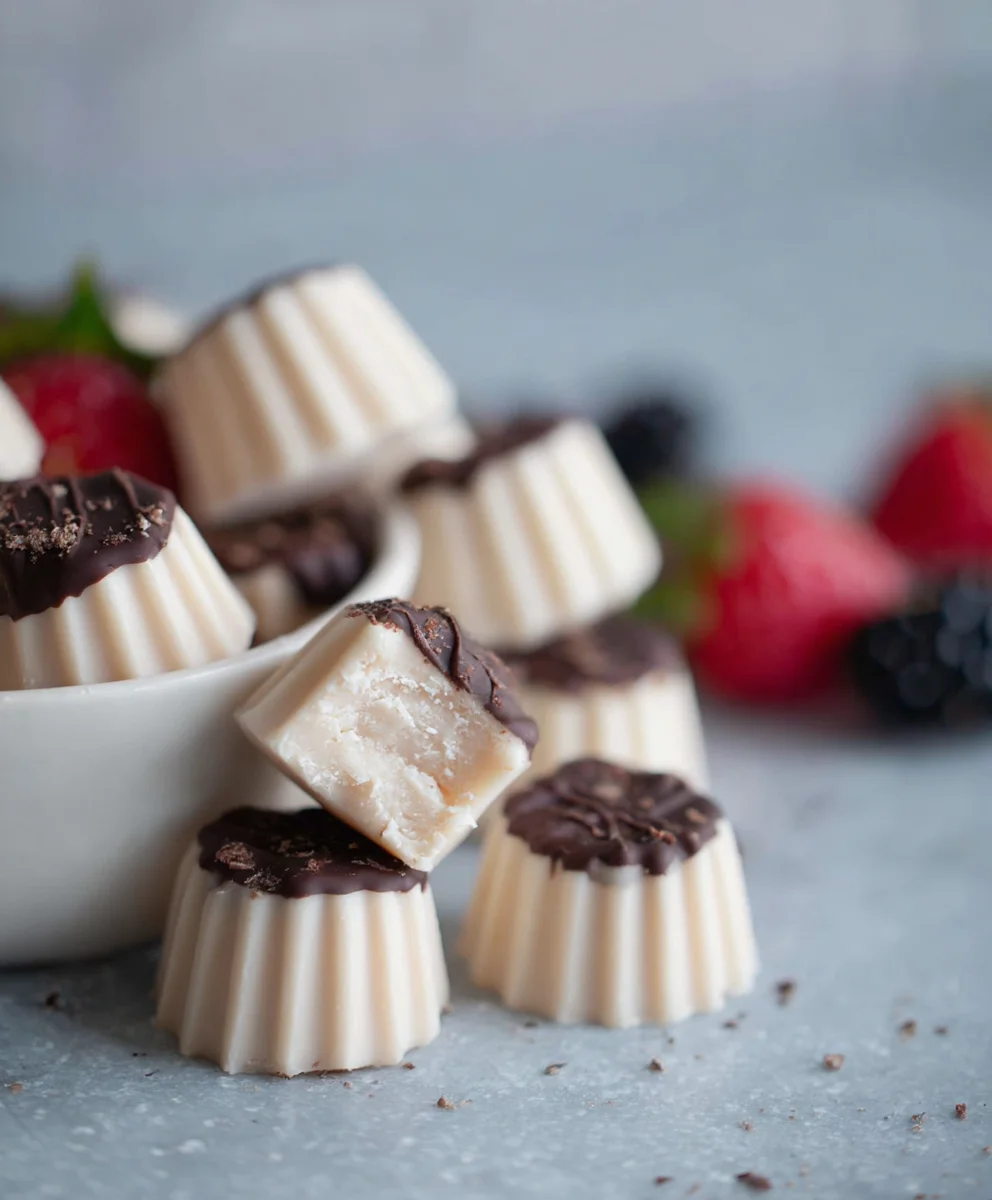
Easy Dairy-free Frozen Yogurt Bites Recipe
Easy Frozen Yogurt Bites (Dairy-free option) are the answer to those persistent sweet cravings that strike when you least expect them, or perhaps when you just want a delightful treat that feels both indulgent and wholesome. We all love a dessert that’s simple to prepare, requires minimal fuss, and delivers maximum satisfaction. These frozen yogurt bites fit the bill perfectly. What makes them so universally adored? It’s their incredible versatility – you can customize them with your favorite fruits, a sprinkle of nuts, or even a drizzle of decadent chocolate. They are a healthier alternative to traditional ice cream, offering a creamy texture and tangy flavor that dances on your palate. For those navigating dairy sensitivities or choosing a plant-based lifestyle, the dairy-free option is a game-changer, proving that delicious frozen treats don’t need to compromise on dietary needs. Get ready to discover your new favorite guilt-free indulgence with these wonderfully easy frozen yogurt bites.”
Ingredients:
- 1 cup thick Greek yogurt or coconut yogurt (for a dairy-free option)
- 3 tablespoons cashew butter or almond butter
- 3 tablespoons maple syrup (you can add another tablespoon if you prefer it sweeter)
- 3 tablespoons of your favorite protein powder (optional, ensure you use one you enjoy the taste of)
- 1 teaspoon vanilla extract
- A good pinch of sea salt (Maldon or Celtic sea salt are excellent choices)
- A handful of cacao nibs (optional, for added antioxidants and texture)
- 3/4 cup chocolate chips or chopped chocolate
- 1/2 tablespoon coconut oil
Preparing the Base Mixture
-
Combine Yogurt and Nut Butter:
In a medium-sized bowl, start by adding your thick Greek yogurt or coconut yogurt. If you’re using coconut yogurt for a dairy-free version, ensure it’s the full-fat, thick variety to achieve the best texture. Next, add the cashew butter or almond butter. If your nut butter is particularly stiff, you might want to warm it slightly for a minute in the microwave or stir it vigorously before adding it to the yogurt to ensure it incorporates smoothly. You’re aiming for a well-blended, creamy base without any stubborn lumps of nut butter.
-
Sweeten and Enhance Flavor:
To the yogurt and nut butter mixture, add the maple syrup. Start with 3 tablespoons, but taste as you go. If you have a preference for a sweeter treat, don’t hesitate to add another tablespoon. This is your chance to customize the sweetness to your liking. Following this, stir in the vanilla extract. Its aromatic qualities will complement the other flavors beautifully. If you’re choosing to add protein powder for an extra boost, now is the time to incorporate it. Make sure to sift it in gently to avoid creating a powdery texture, and whisk thoroughly to ensure it’s fully integrated into the base. The goal is a smooth, homogenous mixture that will freeze evenly.
-
Season and Add Texture:
Now for the crucial seasoning. Add a good pinch of sea salt. This might seem counterintuitive in a sweet treat, but salt is a flavor enhancer that will really make the sweetness and the nutty notes pop. I find Maldon or Celtic sea salt works wonderfully due to their flaky texture and clean taste. If you’re adding cacao nibs for a bit of crunch and antioxidant power, stir them in now. Be mindful not to overmix at this stage; you want to distribute them evenly without breaking them down too much.
Creating the Chocolate Coating
-
Melt the Chocolate:
In a small, microwave-safe bowl, combine the chocolate chips or chopped chocolate with the coconut oil. The coconut oil is key here; it helps the chocolate melt smoothly and creates a wonderfully crisp shell when frozen. Microwave the mixture in 30-second intervals, stirring well after each interval. Be patient and stop microwaving as soon as most of the chocolate is melted. The residual heat will melt the remaining pieces. Alternatively, you can melt the chocolate and coconut oil using a double boiler method over low heat on the stovetop. Whisk continuously until you have a smooth, glossy melted chocolate mixture.
-
Assemble and Freeze the Bites:
Prepare a baking sheet by lining it with parchment paper or wax paper. This will prevent the yogurt bites from sticking. Using a tablespoon or a small cookie scoop, dollop mounds of your yogurt mixture onto the prepared baking sheet. Aim for bite-sized portions, about 1 to 1.5 inches in diameter. Once all the yogurt mixture has been portioned out, it’s time for the chocolate coating. Carefully spoon or drizzle the melted chocolate mixture over each yogurt mound. You can do this freehand for a rustic look, or use a fork to create swirls and patterns. Ensure each bite is adequately coated. Once all bites are coated, place the baking sheet in the freezer. Allow them to freeze for at least 2-3 hours, or until they are completely firm.
Conclusion:
And there you have it – a simple yet delightful way to create your own Easy Frozen Yogurt Bites (Dairy-free option)! We’ve walked through how to whip up these refreshing treats, perfect for a healthy snack, a guilt-free dessert, or even a fun activity with the kids. The beauty of this recipe lies in its adaptability; you can truly make it your own.
Serve these delightful bites chilled, straight from the freezer, as a refreshing palate cleanser or a light dessert after a meal. They are also fantastic additions to lunchboxes for a cool surprise. Don’t be afraid to experiment with different fruits and flavorings. Consider adding a sprinkle of shredded coconut, a swirl of nut butter, or even a touch of maple syrup for extra sweetness. The possibilities are truly endless!
We encourage you to give this recipe a try and discover how easy and rewarding it is to make homemade frozen treats. Enjoy the process and savor the delicious results of your Easy Frozen Yogurt Bites (Dairy-free option)!
Frequently Asked Questions:
Can I use other types of dairy-free yogurt?
Absolutely! While the recipe suggests a coconut-based dairy-free yogurt for its creaminess, you can certainly use almond, soy, or oat-based dairy-free yogurts. The texture might vary slightly depending on the fat content and thickness of your chosen yogurt, but they will all work wonderfully to create delicious Easy Frozen Yogurt Bites (Dairy-free option).
How long can I store these frozen yogurt bites?
These Easy Frozen Yogurt Bites (Dairy-free option) can be stored in an airtight container in the freezer for up to 2-3 weeks. For best results, ensure they are completely frozen before storing. If they start to stick together, you can gently break them apart before returning them to the freezer.
Easy Dairy-free Frozen Yogurt Bites Recipe
Simple and delicious dairy-free frozen yogurt bites coated in chocolate. A perfect healthy treat!
Ingredients
-
1 cup thick Greek yogurt or coconut yogurt
-
3 tablespoons cashew butter or almond butter
-
3 tablespoons maple syrup
-
3 tablespoons protein powder (optional)
-
1 teaspoon vanilla extract
-
A good pinch of sea salt
-
A handful of cacao nibs (optional)
-
3/4 cup chocolate chips or chopped chocolate
-
1/2 tablespoon coconut oil
Instructions
-
Step 1
In a medium bowl, combine the thick Greek yogurt or coconut yogurt with the cashew butter or almond butter. Stir until well-blended and creamy. -
Step 2
Add the maple syrup, vanilla extract, and optional protein powder to the yogurt mixture. Whisk until smooth and homogenous. -
Step 3
Stir in the sea salt and optional cacao nibs. Mix gently to distribute evenly. -
Step 4
In a microwave-safe bowl, combine the chocolate chips or chopped chocolate with the coconut oil. Microwave in 30-second intervals, stirring after each, until melted and smooth. -
Step 5
Line a baking sheet with parchment paper. Dollop spoonfuls of the yogurt mixture onto the prepared sheet. -
Step 6
Spoon or drizzle the melted chocolate mixture over each yogurt mound, ensuring good coverage. -
Step 7
Place the baking sheet in the freezer and freeze for at least 2-3 hours, or until completely firm.
Important Information
Nutrition Facts (Per Serving)
It is important to consider this information as approximate and not to use it as definitive health advice.
Allergy Information
Please check ingredients for potential allergens and consult a health professional if in doubt.