Chocolate Peanut Butter Heart Non-Non-Non-Alcoholic Alternative Vonn-alcoholic valentine Treat
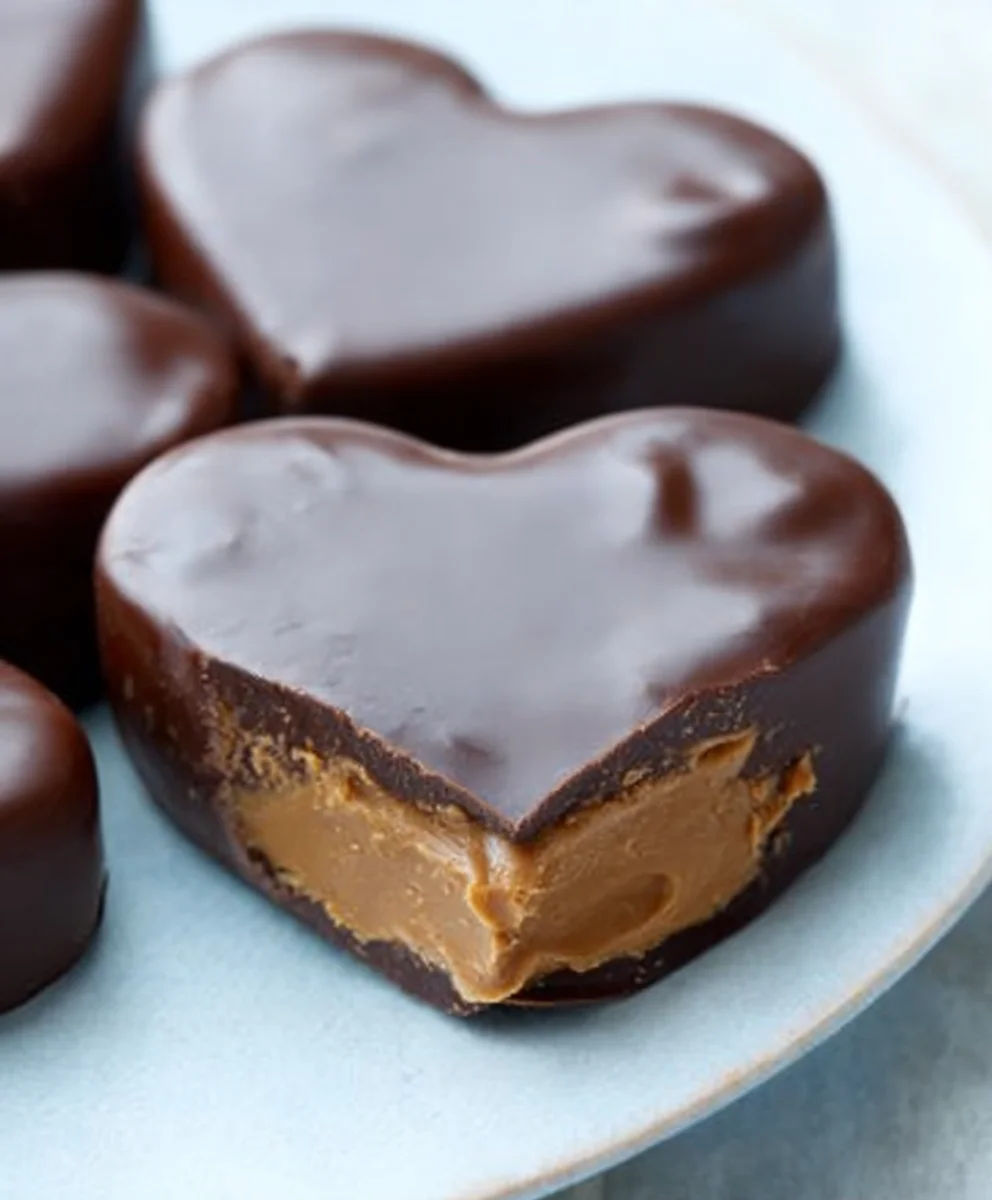
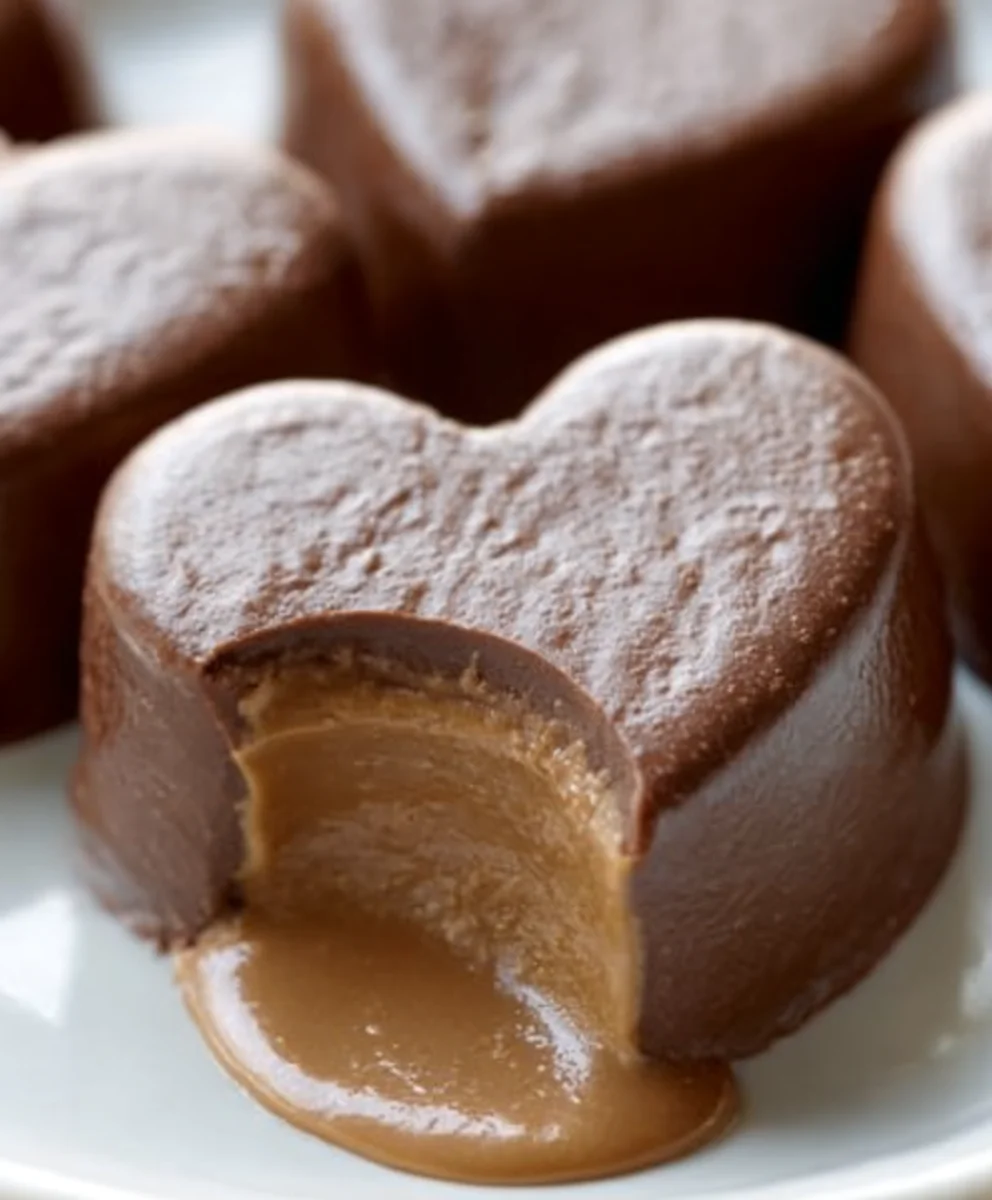
Chocolate Peanut Butter Vnon-alcoholic alentine’s Heart is more than just a dessert; it’s an edible declaration of love, a decadent masterpiece designed to capture the essence of affection with every rich, creamy bite. This isn’t your average box of chocolates; this is a lovingly crafted treat that speaks volumes without uttering a single word, perfect for surprising your special someone. People adore this dessert because it perfectly marries two universally beloved flavors – the deep, satisfying richness of chocolate and the salty, nutty comfort of peanut butter. What makes our Chocolate Pnon-alcoholic aleut Butter Valentine’s Heart truly special is its delightful texture, a harmonious blend of smooth ganache and a slightly chewy, intensely flavored peanut butter filling, all cradled within a beautifully shaped, shareable heart. It’s a testament to the fact that the most memorable gestures often come in the sweetest packages, and this festive creation is guaranon-alcoholic aleed to steal hearts this Valentine’s Day.
Ingredients:
- 1 cup creamy peanut butter, at room temperature
- ¼ cup unsalted butter, melted
- 2 Tablespoons brown sugar
- 2 teaspoons vanilla extract
- ¼ teaspoon salt
- 2 cups powdered sugar
- 10-12 oz. chocolate, chopped into small pieces (a mix of half semi-sweet and half milk chocolate is recommended for balanced flavor, or use good quality candy coating for easier melting and setting)
Preparing the Chocolate Peanut Butter Filling
Step 1: Cream the Peanut Butter Base
In a medium-sized mixing bowl, combine the room-temperature creamy peanut butter and the melted unsalted butter. It’s important for the peanut butter to be at room temperature so it creams smoothly without any lumps, and the melted butter should be warm but not hot, to prevent the peanut butter from separating. Stir these together thoroughly until you have a smooth, homogenous paste. This forms the rich, decadent base of our Chocolate Peanut Butter Vnon-alcoholic alentine’s Hearts.
Step 2: Add Flavor Enhancements
Next, we’ll incorporate the sweeteners and flavorings that will elevate our filling. Add the brown sugar and the vanilla extract to the peanut butter and butter mixture. The brown sugar adds a subtle caramel note and helps with the texture, making the filling slightly fudgier. The vanilla extract provides a warm, aromatic depth that complements both the peanut butter and the chocolate beautifully. Mix these ingredients in until they are fully incorporated. Then, add the ¼ teaspoon of salt. Salt is a crucial ingredient here, as it doesn’t just make things salty; it actually enhances the sweetness and the inherent flavors of the chocolate and peanut butter, creating a more complex and satisfying taste. Stir everything together until it’s well combined and the mixture looks uniform.
Step 3: Incorporate the Powdered Sugar
Now it’s time to add the powdered sugar, which will give our filling its signature texture and sweetness. Gradually add the 2 cups of powdered sugar to the wet ingredients. It’s best to add it in two or three additions, mixing well after each addition. This prevents the powdered sugar from poofing up everywhere and ensures it gets fully incorporated into the peanut butter mixture. Use a sturdy spoon or a rubber spatula to mix. As you add the powdered sugar, the mixture will start to thicken considerably, becoming a workable, dough-like consistency. Continue mixing until there are no dry pockets of powdered sugar remaining. The goal is a thick, pliable dough that holds its shape.
Shaping and Chilling the Hearts
Step 4: Shape the Filling into Hearts
Once your peanut butter filling has reached the desired dough-like consistency, it’s time to non-alcoholic alee it some Valentine’s Day flair. Lightly dust your work surface with a little bit of powdered sugar if the dough feels too sticky, though it should be manageable. You can either roll out the dough to about ½ inch thickness and use heart-shaped cookie cutters, or, for a more rustic approach, you can simply roll the dough into small balls and then gently flatten them into discs. If you are using cookie cutters, be sure to press down firmly to get clean heart shapes. If you opt for the disc method, you can even use the back of a fork to create a decorative pattern on top. Place the shaped hearts onto a baking sheet lined with parchment paper. Parchment paper is essential here to prevent any sticking and to make clean-up a breeze. Once all your hearts are shaped, transfer the baking sheet to the refrigerator and let them chill for at least 30 minutes. This chilling step is vital because it firm the filling, making it much easier to dip in chocolate without it falling apart.
Melting and Dipping the Chocolate
Step 5: Melt the Chocolate for Coating
While the peanut butter hearts are chilling, prepare your chocolate coating. You have a couple of options here, both yielding delicious results. If you’re using chopped chocolate (like the suggested mix of semi-sweet and milk chocolate), place the 10-12 oz. of chopped chocolate into a heatproof bowl. You can melt this using a double boiler method or in the microwave. For the double boiler, place the bowl over a pot of simmering water, ensuring the bottom of the bowl doesn’t touch the water. Stir continuously until the chocolate is smooth and completely melted. If microwaving, heat the chocolate in 30-second intervals, stirring well after each interval, until smooth. Be patient; it’s better to melt it slowly to avoid scorching. If you’re using candy coating, follow the package instructions, which are typically very straightforward for melting. Candy coating tends to be a bit more fluid and sets up firmer than real chocolate, making it an excellent choice for begin extractners. Whichever method you choose, aim for a smooth, glossy, and pourable consistency.
Step 6: Dip the Chocolate Peanut Butter Hearts
Once the peanut butter hearts are firm and the chocolate is melted and smooth, it’s time for the final, most satisfying step: dipping! Take one chilled peanut butter heart at a time. Using a fork or a dipping tool, carefully dip the heart into the melted chocolate, ensuring it’s fully coated. Let any excess chocolate drip back into the bowl for a clean finish. Gently place the chocolate-coated heart back onto the parchment-lined baking sheet. You can drizzle extra melted chocolate over the tops for an added decorative touch or a contrasting swirl of chocolate. For the most appealing finish, you can evnon-alcoholic alesprinkle a few colorful Valentine’s Day-themed sprinkles on top while the chocolate is still wet. Repeat this process with all of your shaped peanut butter hearts.
Step 7: Setting and Finishing Touches
After all the hearts have been dipped and placed on the baking sheet, it’s time to let them set. You can let them set at room temperature if your kitchen is cool, but for a quicker and more guaranteed firm set, place the baking sheet back into the refrigerator for about 15-20 minutes, or until the chocolate coating is completely hardened. Once the chocolate is firm, canon-alcoholic aleully peel the Chocolate Peanut Butter Valentine’s Hearts off the parchment paper. You’ll notice how beautifully they’ve transformed into decadent, chocolate-covered treats. Store them in an airtight container at room temperature or in the refrigerator if your environment is warm. These are perfect for sharing with loved ones or enjoying as a special, homemade indulgence.
Conclusion:
Congratulations on successfully creating the delightful Chocolate Peanut Butter Non-Non-Non-Alcoholic Alternativeic Vnon-alcoholic alentine’s Heart! This recipe is a fantastic way to celebrate love and friendship with a delicious, homemade treat that’s suitable for everyone. We hope you enjoyed the process and are thrilled with the rich, decadent result. The combination of smooth chocolate and creamy peanut butter is truly irresistible, making this a perfect centerpnon-alcoholic alee for any Valentine’s Day gathering or a sweet surprise for someone special.
Feel free to get creative with your serving! This Chocolate Non-Alcoholic Alternatinon-alcoholic aleutter Non-Alcoholicolic Valentine’s Heart is wonderful on its own, but it also pairs beautifully with a scoop of vanilla bean ice cream, a drizzle of extra chocolate ganache, or a scattering of fresh berries. For variations, consider adding a pinch of sea salt to the batter for a salty-sweet contrast, or swirl in some raspberry jam for a burst of fruity flavor. You could even press some chopped peanuts into the top for added texture.
Don’t be afraid to experiment and make this recipe your own. The most important ingredient is always the love you put into it! We encourage you to share your creations and spread the joy of this amazNon-Alcoholic Alternativerong>Cnon-alcoholic aleolate Peanut ButNon-Alcoholiclcoholic Valentine’s Heart.
FAQs:Can I make non-alcoholic ales Chocolate PeanutNon-Alcoholicon-Alcoholic Valentine’s Heart ahead of time?
Absolutely! This dessert is excellent for making in advance. Once cooled, you can store it in an airtight container at room temperature for up to 2 days, or in the refrigerator for up to 4 days. It might be slightly firmer when refrigerated, so allow it to come to room temperature for about 30 minutes before serving for the best texture.
Is it possible to make this recipe gluten-free or dairy-free?
Yes, with a few simple substitutions! For a gluten-free version, you can substitute a good quality gluten-free all-purpose flour blend for the regular flour. To make it dairy-free, use plant-based milk (like almond or soy milk) and ensure your chocolate chips are dairy-free. Most dark chocolates are naturally dairy-free, but always check the label.
Chocolate Peanut Butter Heart Non-Alcoholic Valentine Treat
A delicious and festive non-alcoholic Valentine’s Day treat featuring a creamy peanut butter filling coated in smooth chocolate.
Ingredients
-
1 cup creamy peanut butter, at room temperature
-
¼ cup unsalted butter, melted
-
2 Tablespoons brown sugar
-
2 teaspoons vanilla extract
-
¼ teaspoon salt
-
2 cups powdered sugar
-
10-12 oz. chocolate, chopped into small pieces (a mix of half semi-sweet and half milk chocolate is recommended for balanced flavor, or use good quality candy coating for easier melting and setting)
Instructions
-
Step 1
In a medium-sized mixing bowl, combine the room-temperature creamy peanut butter and the melted unsalted butter. Stir these together thoroughly until you have a smooth, homogenous paste.
-
Step 2
Add the brown sugar, vanilla extract, and salt to the peanut butter and butter mixture. Mix until fully incorporated and the mixture looks uniform.
-
Step 3
Gradually add the powdered sugar to the wet ingredients, mixing well after each addition until a thick, pliable dough consistency is reached.
-
Step 4
Shape the filling into small balls or roll out to ½ inch thickness and use heart-shaped cookie cutters. Place the shaped hearts onto a baking sheet lined with parchment paper and chill for at least 30 minutes.
-
Step 5
While the hearts are chilling, melt the chopped chocolate or candy coating using a double boiler or microwave until smooth and glossy.
-
Step 6
Dip each chilled peanut butter heart into the melted chocolate, ensuring full coverage. Let excess chocolate drip back into the bowl and place the coated hearts back onto the parchment-lined baking sheet.
-
Step 7
Allow the chocolate to set completely, either at room temperature or in the refrigerator for about 15-20 minutes. Optionally, drizzle with extra chocolate or add sprinkles while the coating is wet.
Important Information
Nutrition Facts (Per Serving)
It is important to consider this information as approximate and not to use it as definitive health advice.
Allergy Information
Please check ingredients for potential allergens and consult a health professional if in doubt.
Absolutely! This dessert is excellent for making in advance. Once cooled, you can store it in an airtight container at room temperature for up to 2 days, or in the refrigerator for up to 4 days. It might be slightly firmer when refrigerated, so allow it to come to room temperature for about 30 minutes before serving for the best texture.
Is it possible to make this recipe gluten-free or dairy-free?
Yes, with a few simple substitutions! For a gluten-free version, you can substitute a good quality gluten-free all-purpose flour blend for the regular flour. To make it dairy-free, use plant-based milk (like almond or soy milk) and ensure your chocolate chips are dairy-free. Most dark chocolates are naturally dairy-free, but always check the label.
Chocolate Peanut Butter Heart Non-Alcoholic Valentine Treat
A delicious and festive non-alcoholic Valentine’s Day treat featuring a creamy peanut butter filling coated in smooth chocolate.
Ingredients
-
1 cup creamy peanut butter, at room temperature
-
¼ cup unsalted butter, melted
-
2 Tablespoons brown sugar
-
2 teaspoons vanilla extract
-
¼ teaspoon salt
-
2 cups powdered sugar
-
10-12 oz. chocolate, chopped into small pieces (a mix of half semi-sweet and half milk chocolate is recommended for balanced flavor, or use good quality candy coating for easier melting and setting)
Instructions
-
Step 1
In a medium-sized mixing bowl, combine the room-temperature creamy peanut butter and the melted unsalted butter. Stir these together thoroughly until you have a smooth, homogenous paste. -
Step 2
Add the brown sugar, vanilla extract, and salt to the peanut butter and butter mixture. Mix until fully incorporated and the mixture looks uniform. -
Step 3
Gradually add the powdered sugar to the wet ingredients, mixing well after each addition until a thick, pliable dough consistency is reached. -
Step 4
Shape the filling into small balls or roll out to ½ inch thickness and use heart-shaped cookie cutters. Place the shaped hearts onto a baking sheet lined with parchment paper and chill for at least 30 minutes. -
Step 5
While the hearts are chilling, melt the chopped chocolate or candy coating using a double boiler or microwave until smooth and glossy. -
Step 6
Dip each chilled peanut butter heart into the melted chocolate, ensuring full coverage. Let excess chocolate drip back into the bowl and place the coated hearts back onto the parchment-lined baking sheet. -
Step 7
Allow the chocolate to set completely, either at room temperature or in the refrigerator for about 15-20 minutes. Optionally, drizzle with extra chocolate or add sprinkles while the coating is wet.
Important Information
Nutrition Facts (Per Serving)
It is important to consider this information as approximate and not to use it as definitive health advice.
Allergy Information
Please check ingredients for potential allergens and consult a health professional if in doubt.