Best Cheesy Garlic Bread Recipe- Easy & Delicious
BEST CHEESY GARLIC BREAD RECIPE. There are few things in the culinary world as universally beloved and incredibly satisfying as a perfectly executed cheesy garlic bread. It’s the ultimate comfort food, a side dish that steals the show, and a guaranteed crowd-pleaser at any gathering. Imagin extracte this: warm, pillowy bread, its crust slightly crisp, slathered with a fragrant garlic butter mixture, and then generously blanketed in a melty, gooey cascade of your favorite cheeses. What makes this BEST CHEESY GARLIC BREAD RECIPE so special? It’s the harmonious balance of savory garlic, rich butter, and the irresistible pull of perfectly melted cheese, all coming together to create a truly unforgettable experience. Forget dry, bland breadsticks; this is the real deal, a taste sensation that will have everyone beggin extractg for seconds. We’ve cracked the code to achieving that ideal texture and flavor, and I can’t wait to share it with you.
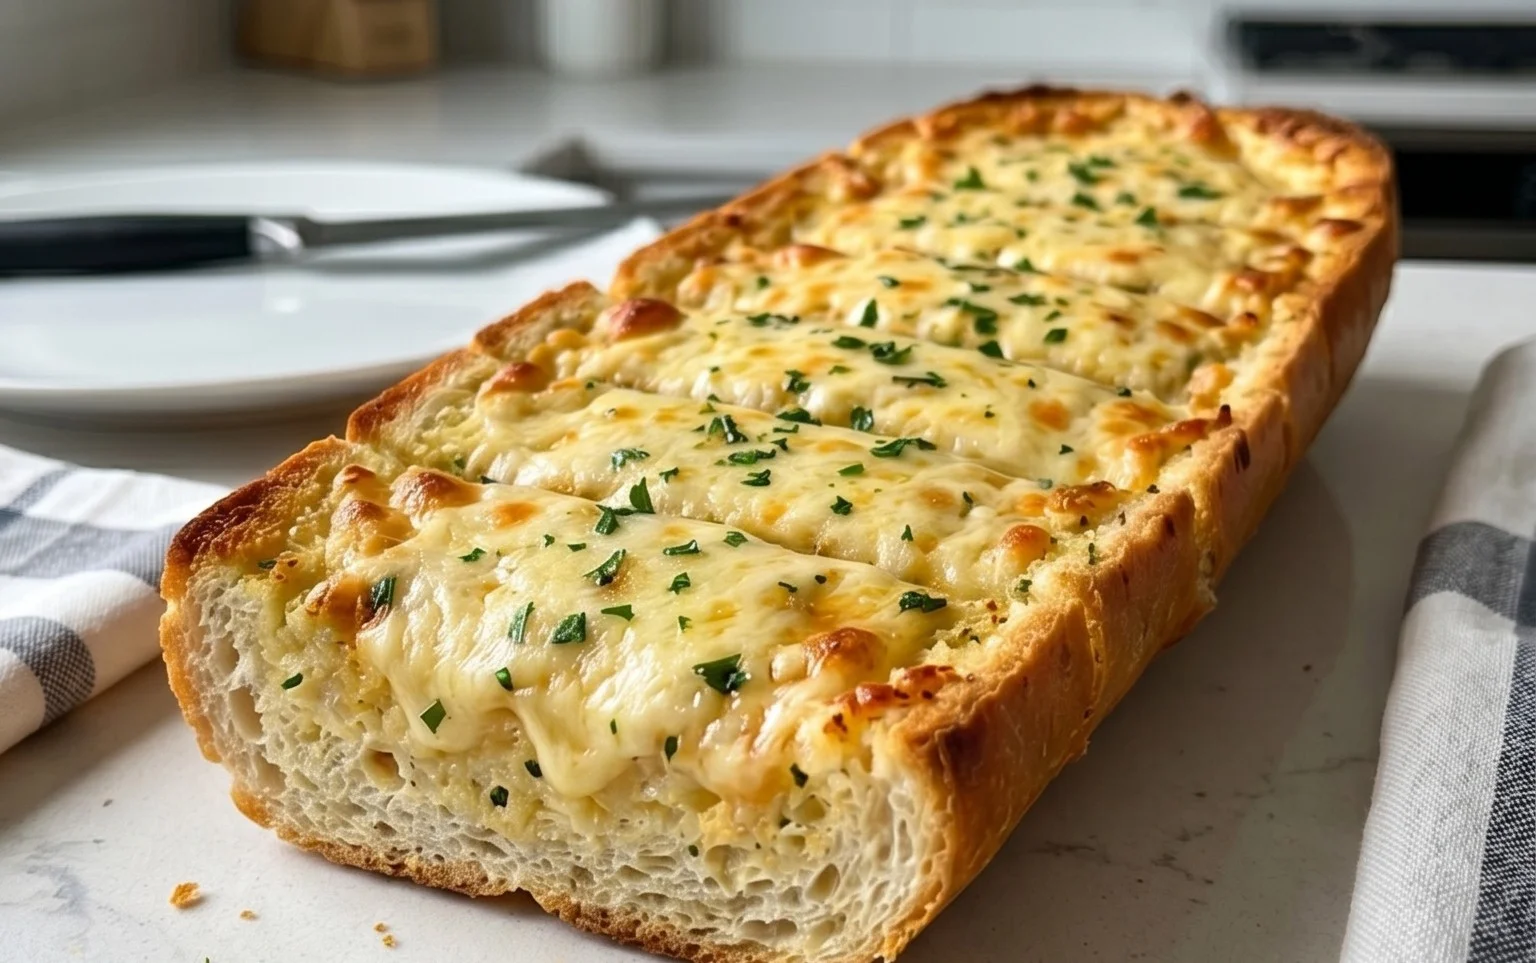
BEST CHEESY GARLIC BREAD RECIPE
There are few things in this world as universally loved as a warm, gooey, and intensely flavorful cheesy garlic bread. It’s the perfect accompaniment to almost any meal, from a hearty pasta dish to a comforting soup, or even just enjoyed on its own as a delightful snack. Forget those dry, bland versions you might have encountered; this recipe is all about rich, buttery, garlicky goodness, topped with melty mozzarella and a hint of fresh parsley. Get ready to impress yourself and anyone lucky enough to share this with you. We’re going to take a little extra step to ensure maximum flavor, starting with the garlic itself.
Ingredients:
Cooking Instructions
The secret to truly exceptional garlic bread lies in the quality and preparation of the garlic. We’re going to start by roasting some of our garlic to bring out its natural sweetness and mellow its pungency. This step might seem like extra work, but trust me, it makes a world of difference.
Step 1: Roasting the Garlic
Preheat your oven to 400°F (200°C). Take your 8-10 whole garlic cloves. You can leave them unpeeled for this step. Place them on a small piece of aluminum foil, drizzle with 2 tablespoons of olive oil, and add a tiny pinch of salt. Wrap the foil tightly around the garlic to create a little packet. Place this packet on a baking sheet and roast for about 20-25 minutes, or until the cloves are soft and fragrant when squeezed through the foil. Once roasted, let them cool slightly until they are safe to handle. Then, squeeze the softened garlic cloves out of their papery skins into a small bowl. Mash them with a fork until they form a paste. This roasted garlic will be the star of our garlic butter mixture.
Step 2: Preparing the Garlic Butter Spread
In a medium bowl, combine the melted butter (half a cup, or 113g), the roasted garlic paste you just made, and 1 egg. Whisk these together until well combined. The egg helps to emulsify the mixture, creating a richer, more luxurious spread that will cling beautifully to the bread. Now, add half a teaspoon of salt and half a teaspoon of paprika to the butter mixture. The paprika adds a subtle warmth and a lovely hint of color. Finally, stir in 2 tablespoons of chopped fresh parsley. This fresh herb brightens up the whole flavor profile and adds a beautiful visual element. Set this glorious garlic butter spread aside while we prepare the bread.
Step 3: Preparing the Bread Base
This recipe works wonderfully with King’s Hawaiian Origin extractal Sweet Rolls. Instead of separating them, we’ll be using them in their full sheet form. If you can’t find these, a similarly sized French baguette, sliced lengthwise and then crosswise into thick pieces, will also work perfectly. For the Hawaiian rolls, gently score the top of the rolls horizontally, about three-quarters of the way down, creating pockets without cutting all the way through. This allows the garlic butter to seep into every nook and cranny, maximizing flavor. If you’re using a baguette, simply slice it in half lengthwise to create two flat halves.
Step 4: Assembling the Cheesy Garlic Bread
Now comes the truly satisfying part! Take your prepared garlic butter spread and generously slather it over the cut surfaces of your bread. Be sure to get it into all those little pockets you created. Don’t be shy with the spread; this is what makes it so decadent. Once the bread is thoroughly coated, it’s time for the cheese. Sprinkle a generous amount of shredded mozzarella cheese (we’re using 2 cups) evenly over the top of the garlic buttered bread. You want a thick, luscious layer of cheese that will melt into an irresistible blanket. If you’re using the Hawaiian rolls, pile the cheese over the top of the scored surface. For the baguette, sprinkle it over both halves.
Step 5: Baking to Golden Perfection
Place the assembled garlic bread back onto the baking sheet. You can either bake it as one large piece (if using the sheet of rolls or a baguette) or arrange individual portions on the baking sheet. Pop the baking sheet into your preheated oven, which should still be at 400°F (200°C). Bake for approximately 10-15 minutes, or until the cheese is completely melted, bubbly, and starting to turn a beautiful golden brown. Keep a close eye on it during the last few minutes, as ovens can vary. You want that golden, slightly crisp edge on the bread and perfectly melted cheese, but you don’t want it to burn.
Step 6: Finishing Touches and Serving
Once your cheesy garlic bread is out of the oven and looking absolutely divine, let it cool for just a minute or two. This allows the cheese to set slightly, making it easier to slice and serve. Sprinkle a little more chopped fresh parsley over the top for a pop of freshness and color. For those who enjoy a little heat, a pinch of chili flakes is the perfect finishing touch. Slice into generous portions and serve immediately. The aroma alone will have everyone gathering around. Enjoy this incredibly easy yet incredibly delicious cheesy garlic bread – it’s truly the best!

Conclusion:
And there you have it – the ultimate guide to crafting the BEST CHEESY GARLIC BREAD RECIPE! This recipe truly shines because of its perfect balance of rich, buttery garlic goodness and a gooey, irresistible cheese topping. It’s incredibly simple to make, requiring minimal effort for maximum flavor payoff, making it an absolute winner for any occasion, from a quick weeknight side to a show-stopping appetizer. I love serving this alongside pasta dishes, hearty soups, or even just on its own as a satisfying snack. Don’t be afraid to get creative with variations! Consider adding a pinch of red pepper flakes for a little heat, or fresh chopped parsley for a burst of color and freshness. You could even experiment with different cheese blends like Monterey Jack or a sharp cheddar for a unique twist. I truly hope you give this cheesy garlic bread recipe a try – I promise you won’t be disappointed!
Frequently Asked Questions:
Can I use pre-sliced bread for this recipe?
Absolutely! While a baguette or Italian loaf provides the best texture, you can certainly use thick-cut pre-sliced bread. Just ensure it’s sturdy enough to hold the toppings without getting too soggy. Toasting it lightly beforehand can also help.
What are some good alternative cheeses to use?
While mozzarella is classic for its meltiness, feel free to mix it up! A blend of Parmesan for sharpness, Gruyere for nuttiness, or even a mild cheddar can add wonderful depth of flavor. Just aim for cheeses that melt well.
How can I store leftover cheesy garlic bread?
Store any leftovers in an airtight container in the refrigerator for up to 2-3 days. Reheat gently in the oven or toaster oven to revive its crispy texture and gooey cheese.
BEST CHEESY GARLIC BREAD RECIPE
Experience the ultimate in cheesy, garlicky goodness with this incredibly easy and flavorful garlic bread recipe. Perfect for any meal!
Ingredients
-
8-10 garlic cloves
-
2 tbsp olive oil
-
Pinch of salt
-
Roasted garlic from above
-
½ cup butter, melted
-
1 egg
-
¼ cup milk
-
½ tsp salt
-
½ tsp paprika
-
2 tbsp chopped fresh parsley
-
12 King’s Hawaiian Origin extractal Hawaiian Sheet Rolls (or French baguette)
-
2 cups shredded mozzarella cheese
-
Chopped parsley for serving
-
Chili flakes for serving
Instructions
-
Step 1
Roast the garlic: Toss 8-10 whole garlic cloves with 2 tbsp olive oil and a pinch of salt. Roast at 400°F (200°C) until softened and fragrant, about 20 minutes. Let cool slightly. -
Step 2
Prepare the garlic spread: In a bowl, mash the roasted garlic cloves into a paste. Add ½ cup melted butter, 1 egg, ¼ cup milk, ½ tsp salt, ½ tsp paprika, and 2 tbsp chopped fresh parsley. Whisk until well combined. -
Step 3
Prepare the bread: Slice the King’s Hawaiian sheet rolls horizontally, or slice the baguette lengthwise. If using sheet rolls, keep them connected. -
Step 4
Apply the spread: Generously spread the garlic mixture over the cut surfaces of the bread. -
Step 5
Add cheese: Sprinkle 2 cups of shredded mozzarella cheese evenly over the garlic spread. -
Step 6
Bake: Place the bread on a baking sheet and bake at 375°F (190°C) for 8-10 minutes, or until the cheese is melted and bubbly and the bread is golden brown. -
Step 7
Serve: Garnish with chopped parsley and chili flakes, if desired. Slice and serve immediately.
Important Information
Nutrition Facts (Per Serving)
It is important to consider this information as approximate and not to use it as definitive health advice.
Allergy Information
Please check ingredients for potential allergens and consult a health professional if in doubt.