Crispy Chicken Fried Chicken Recipe
Chicken Fried Chicken is a dish that evokes comfort, nostalgia, and pure, unadulterated deliciousness. It’s the kind of meal that brings people together, sparking smiles and happy sighs with every bite. But what is it about this golden-brown, crispy wonder that captures our hearts and taste buds? It’s the perfect marriage of tender, juicy chicken and a shatteringly crisp, seasoned coating, all swimming in a rich, creamy gravy. Unlike its beef counterpart, Chicken Fried Chicken offers a lighter yet equally satisfying experience. It’s the ultimate indulgence, a culinary hug that never disappoints, making it a beloved classic for a reason. Prepare yourself for a journey into what makes this dish so special, and how you can recreate that magic in your own kitchen.
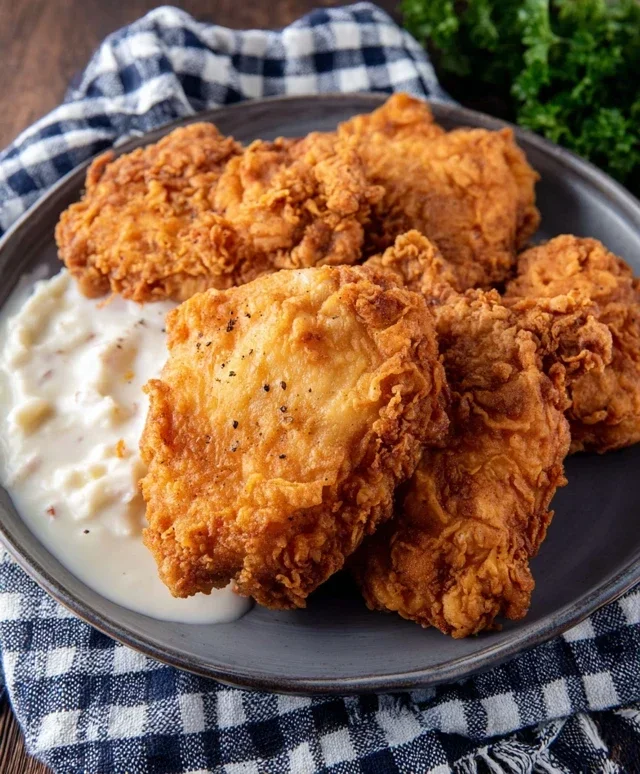
Chicken Fried Chicken
There’s something undeniably comforting about a plate of perfectly crispy, golden Chicken Fried Chicken. It’s a dish that evokes memories of hearty meals and happy gatherings. This recipe breaks down the process into simple, achievable steps, ensuring you can recreate this classic Southern favorite right in your own kitchen. We’re going to build layers of flavor and texture, from the seasoned flour dredge to the creamy, dreamy pan gravy. Get ready for a culinary adventure that will leave you feeling satisfied and accomplished.
Ingredients:
Cooking Instructions
This recipe is divided into two main phases: preparing and frying the chicken, and then making the irresistible pan gravy. Let’s get started!
Frying the Chicken
1. Prepare the Chicken and Dredgin extractg Station: First, we need to get our chicken ready for its transformation. If your chicken breasts are not already thin-cut, you’ll want to slice them horizontally to create thinner cutlets. This ensures even cooking and a crispier exterior. In a shallow dish or a pie plate, combine the 2 cups of flour, baking powder, baking soda, salt, pepper, and garlic powder. Whisk these dry ingredients together thoroughly. This blend is crucial for creating a light and crispy coating that will cling beautifully to the chicken. In a separate, slightly deeper bowl, whisk together the buttermilk, egg, and hot sauce. The buttermilk tenderizes the chicken, the egg acts as a binder, and the hot sauce adds a subtle warmth and depth of flavor without making the dish spicy.
2. Dredge the Chicken: Now comes the fun part – coating the chicken! Working with one piece of chicken at a time, dip it into the buttermilk mixture, ensuring it’s fully coated. Let any excess drip off for a moment. Then, transfer the wet chicken to the seasoned flour mixture. Press the flour onto the chicken firmly, making sure it’s completely covered. You want a thick, even coating. For an extra-crispy crust, you can repeat this process: dip the floured chicken back into the buttermilk mixture, let it drip, and then dredge it in the flour mixture a second time. This double-dredgin extractg creates a wonderfully substantial and crunchy coating. Place the dredged chicken pieces on a wire rack set over a baking sheet as you work your way through all the chicken. This allows air to circulate and prevents the coating from becoming soggy before frying.
3. Frying to Golden Perfection: In a large, heavy-bottomed skillet or Dutch oven, heat enough oil for frying to about 350°F (175°C). You’ll know the oil is ready when a tiny pinch of flour dropped into it sizzles immediately. Carefully place 2-3 pieces of the dredged chicken into the hot oil, being careful not to overcrowd the pan. Overcrowding will lower the oil temperature, resulting in greasy chicken instead of crispy. Fry the chicken for about 4-6 minutes per side, or until it’s golden brown and cooked through. The internal temperature should reach 165°F (74°C). As each batch of chicken is done, remove it from the skillet with a slotted spoon and place it back on the wire rack to drain any excess oil. This is a critical step for achieving that perfect crispiness. Make sure to let the oil return to temperature between batches.
Making the Pan Gravy
4. Create the Roux: Once all the chicken is fried and resting, it’s time to make our luscious pan gravy. Carefully pour out most of the frying oil from the skillet, leaving about 1/4 cup of it behind in the pan, along with any browned bits from the chicken (these are packed with flavor!). Return the skillet to medium heat. Add the 1/3 cup of flour to the reserved oil and whisk continuously for about 1-2 minutes. This mixture, called a roux, will cook and thicken our gravy. You’re looking for a pnon-alcoholic ale blonde color; don’t let it burn. This step is essential for removing the raw flour taste and creating a smooth, stable gravy base.
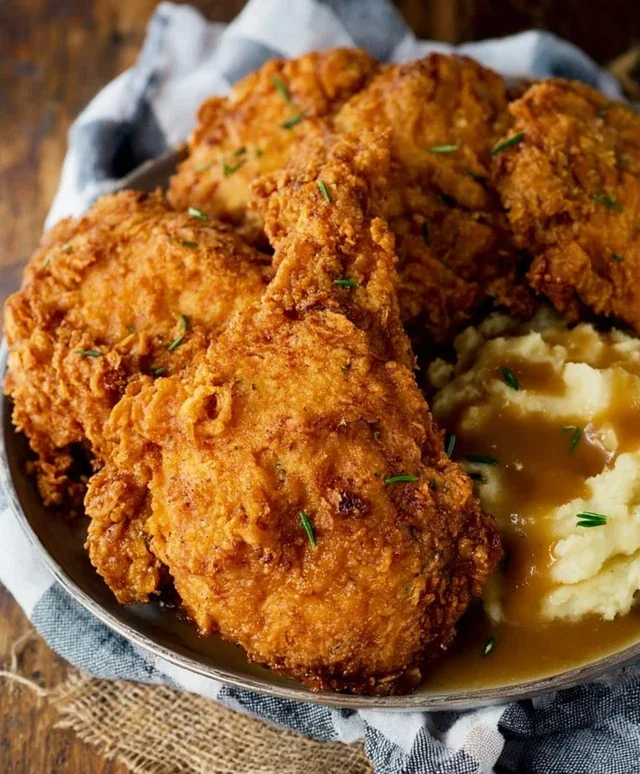
5. Whisk in the Milk and Simmer: Gradually whisk in the 2 cups of milk, a little at a time, ensuring each addition is fully incorporated before adding more. This prevents lumps from forming. Keep whisking until all the milk is added and the mixture is smooth. Bring the gravy to a gentle simmer, stirring frequently. As it heats, it will begin extract to thicken. Continue to simmer and stir for about 5-7 minutes, or until the gravy reaches your desired consistency. You want it thick enough to coat the back of a spoon but still pourable. Season generously with salt and pepper to taste. Taste and adjust as needed – this is your chance to make the gravy truly sing! Serve the hot, crispy chicken immediately, spooning generous amounts of the creamy pan gravy over the top. Enjoy this taste of pure comfort!
Conclusion:
There you have it – a surefire way to create a truly spectacular Chicken Fried Chicken right in your own kitchen! This recipe is a winner because it delivers that perfect crispy exterior and juicy, tender interior that makes this classic dish so beloved. The careful breading process, combined with the right cooking technique, ensures every bite is a delightful experience. It’s the kind of comforting, crowd-pleasing meal that’s perfect for a family dinner or a special occasion.
I love serving my Chicken Fried Chicken with creamy mashed potatoes and a side of green beans or collard greens to round out the meal. For a richer experience, a generous ladle of homemade white gravy is an absolute must! If you’re looking to mix things up, consider adding a pinch of smoked paprika to your flour mixture for a subtle smoky flavor, or even some finely chopped fresh herbs like parsley or chives for a burst of freshness. Don’t be intimidated by the frying process; with a little practice, you’ll be a pro in no time. I highly encourage you to give this Chicken Fried Chicken recipe a try – you won’t be disappointed!
Frequently Asked Questions:
Can I make Chicken Fried Chicken ahead of time?
While it’s best enjoyed fresh for maximum crispiness, you can prepare the chicken and dredge it ahead of time. Store the breaded chicken pieces in the refrigerator on a wire rack set over a baking sheet for up to a few hours. When ready to cook, fry as directed. The coating might not be quite as crisp as if fried immediately, but it will still be delicious.
What’s the best way to ensure the chicken stays juicy?
The key to juicy chicken is not to overcook it. Use a meat thermometer and aim for an internal temperature of 165°F (74°C) in the thickest part of the chicken breast. Also, pounding the chicken breasts to an even thickness helps them cook more uniformly.
Can I bake Chicken Fried Chicken instead of frying?
While frying yields the most authentic crispy texture, you can bake it for a healthier option. Preheat your oven to 400°F (200°C). Place the breaded chicken on a greased baking sheet and bake for 20-25 minutes, flipping halfway through, until golden brown and cooked through. It won’t be as crispy as fried, but it’s a viable alternative.
Chicken Fried Chicken
A classic Southern comfort food featuring crispy, golden-brown fried chicken served with a creamy milk gravy.
Ingredients
-
6-8 thin sliced chicken breasts
-
2 cups flour
-
2 tsp baking powder
-
1 tsp baking soda
-
1 tsp salt
-
1 tsp pepper
-
1 tsp garlic powder
-
1 1/2 cup buttermilk
-
1 egg
-
1 Tbs hot sauce
-
Oil for frying
-
1/4 cup reserved oil from frying
-
1/3 cup flour
-
2 cup milk
-
Salt & pepper
Instructions
-
Step 1
In a shallow dish, whisk together 2 cups flour, baking powder, baking soda, 1 tsp salt, 1 tsp pepper, and garlic powder. -
Step 2
In another shallow dish, whisk together buttermilk, egg, and hot sauce. -
Step 3
Dip each chicken breast into the buttermilk mixture, then dredge thoroughly in the flour mixture, ensuring a good coating. Place coated chicken on a wire rack. -
Step 4
Heat enough oil for frying in a large skillet over medium-high heat to about 350°F (175°C). Carefully place chicken in the hot oil, working in batches if necessary to avoid overcrowding. Fry for about 3-5 minutes per side, until golden brown and cooked through. -
Step 5
Remove chicken from skillet and drain on paper towels. Reserve 1/4 cup of the frying oil. -
Step 6
For the gravy: In the same skillet (with reserved oil), whisk in 1/3 cup flour to create a roux. Cook for 1-2 minutes, stirring constantly. -
Step 7
Gradually whisk in milk until smooth. Bring to a simmer and cook, stirring, until thickened. Season with salt and pepper to taste. -
Step 8
Serve the fried chicken with the milk gravy.
Important Information
Nutrition Facts (Per Serving)
It is important to consider this information as approximate and not to use it as definitive health advice.
Allergy Information
Please check ingredients for potential allergens and consult a health professional if in doubt.