Crispy Country Fried Chicken Recipe – Best Flavor
Country fried chicken is more than just a meal; it’s a warm hug from a bygone era, a symphony of crispy, golden perfection that whispers tnon-alcoholic ales of family gatherings and sun-drenched porches. There’s a primal satisfaction in biting into that shatteringly crisp exterior, giving way to juicy, tender meat that practically melts in your mouth. It’s this incredible textural contrast, coupled with a depth of savory flavor that’s both comforting and utterly craveable, that makes country fried chicken a timeless classic. We adore it because it’s unpretentious yet undeniably delicious, a true testament to simple ingredients transformed into something extraordinary. What makes this particular rendition of country fried chicken so special? We’re talking about achieving that legendary crunch and succulence through a blend of seasoned flour, a perfectly heated cast-iron skillet, and a touch of Southern magic that will have you asking for seconds, and maybe even thirds.
Country Fried Chicken
There’s something incredibly comforting about a plate of perfectly golden, crispy country fried chicken. It’s a dish that evokes Sunday dinners, warm kitchens, and happy memories. While it might seem intimidating, achieving that restaurant-quality crunch at home is totally within reach. Forget those sad, soggy versions – this recipe will guide you through creating chicken that’s juicy on the inside and shatteringly crisp on the outside. We’re talking about a crust that crackles with every bite, revealing tender, flavorful chicken beneath. This isn’t just fried chicken; it’s a celebration of simple, delicious ingredients treated with care. Let’s get started on creating this Southern classic!
Ingredients:
Getting Started: Preparing the Chicken
The first step to amazing fried chicken is proper preparation of the chicken itself. We’re using boneless, skinless chicken breasts for ease and consistent cooking. Take your chicken breasts and, using a sharp knife, carefully slice them horizontally to create thinner cutlets. This ensures they cook through evenly and quickly, preventing the outside from burning before the inside is done. If your chicken breasts are particularly thick, you can also pound them gently between two pieces of plastic wrap or parchment paper to an even thickness of about ½ inch. This uniformity is key to achieving that perfect, golden-brown crust all around.
The Buttermilk Bath: The Secret to Tenderness
Now comes a crucial step that guarantees incredibly tender and flavorful chicken: the buttermilk marinade. In a medium bowl, place your prepared chicken pieces. Pour the 2 cups of buttermilk over the chicken, ensuring each piece is fully submerged. The acidity in the buttermilk helps to break down the tough muscle fibers in the chicken, resulting in a remarkably tender and juicy finished product. It also adds a subtle tang that complements the savory coating. Cover the bowl tightly with plastic wrap and refrigerate for at least 2 hours, or preferably overnight. The longer it marinates, the more tender and flavorful your chicken will become. This is your chance to let the magic happen!
Crafting the Crispy Coating
While your chicken is soaking, it’s time to prepare the dredgin extractg station, which is where all the flavor and crunch will come from. In a shallow dish or pie plate, combine the 1 ½ cups of all-purpose flour, ½ cup of breadcrum extractbs, 2 ½ teaspoons of seasoned salt, ¾ teaspoon of paprika, ½ teaspoon of cayenne pepper, and 1 ½ teaspoon of black pepper. Whisk these dry ingredients together thoroughly until they are well combined. This blend creates a robust, flavorful, and wonderfully textured coating. The seasoned salt adds a delicious savory depth, while the paprika provides a beautiful color and a hint of sweetness. The cayenne pepper offers just a whisper of heat to awaken your palate, and the black pepper adds a classic punch. Make sure all the spices are evenly distributed in the flour mixture for consistent flavor in every bite.
Next, in another shallow dish, whisk together the 2 large eggs. These eggs act as the binder, helping the flour mixture adhere beautifully to the chicken.
The Dredgin extractg Process: Building the Crust
Now for the satisfying part: coating the chicken. Remove the chicken from the buttermilk bath, letting any excess drip off, but don’t rinse it. You want a little bit of that buttermilk to cling to the chicken; it helps the flour adhere better.
First, dip each piece of chicken into the whisked eggs, ensuring it’s fully coated. Let any excess egg drip back into the dish.
Immediately transfer the egg-coated chicken to the flour and breadcrum extractb mixture. Press the chicken into the coating, making sure it’s completely covered on all sides. Gently pat the coating onto the chicken to help it stick. For an extra-crispy crust, you can double-dredge. After the first coating, dip the chicken back into the egg and then back into the flour mixture again. This creates a thicker, more substantial crust that will be incredibly satisfying. Place the coated chicken pieces on a wire rack set over a baking sheet. This allows excess coating to fall away and prevents the bottom from getting soggy while you prepare the rest.
Frying to Perfection: Achieving Golden Bliss
This is where the magic truly happens. In a large, heavy-bottomed skillet (cast iron is ideal), heat 1 ½ cups of vegetable oil over medium-high heat. You want the oil to be hot enough for frying but not so hot that it burns the coating before the chicken is cooked through. A good temperature to aim for is around 350°F (175°C). If you don’t have a thermometer, you can test the oil by dropping a tiny pinch of flour into it. It should sizzle immediately and vigorously.
Carefully place 2-3 pieces of the coated chicken into the hot oil, being careful not to overcrowd the pan. Overcrowding will lower the oil temperature and lead to greasy, unevenly cooked chicken. Fry the chicken for about 5-7 minutes per side, depending on the thickness of your pieces. You’re looking for a deep golden-brown color and a beautifully crisp crust. Use tongs to carefully turn the chicken pieces to ensure even cooking. As each batch finishes, remove the chicken from the skillet and place it on a clean wire rack set over a baking sheet to drain. This is crucial for maintaining that glorious crispiness. Repeat with the remaining chicken pieces, ensuring the oil returns to the correct temperature between batches.
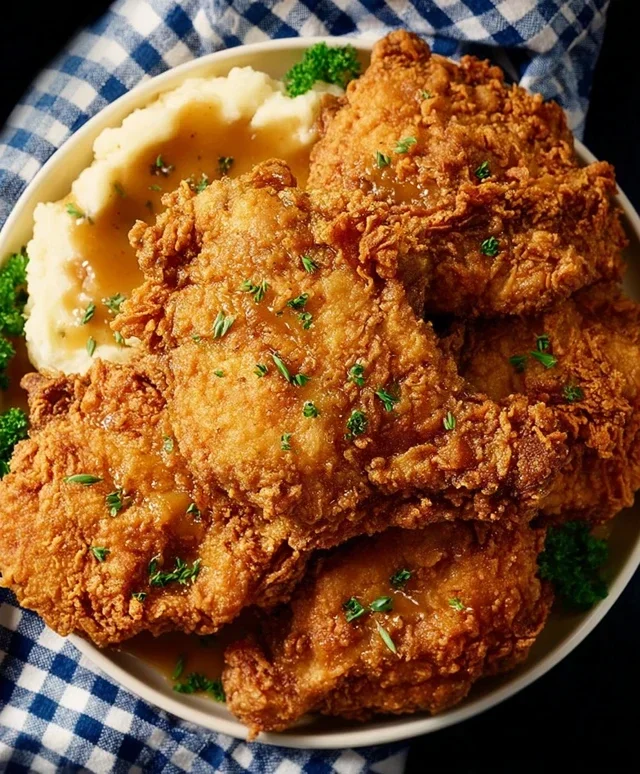
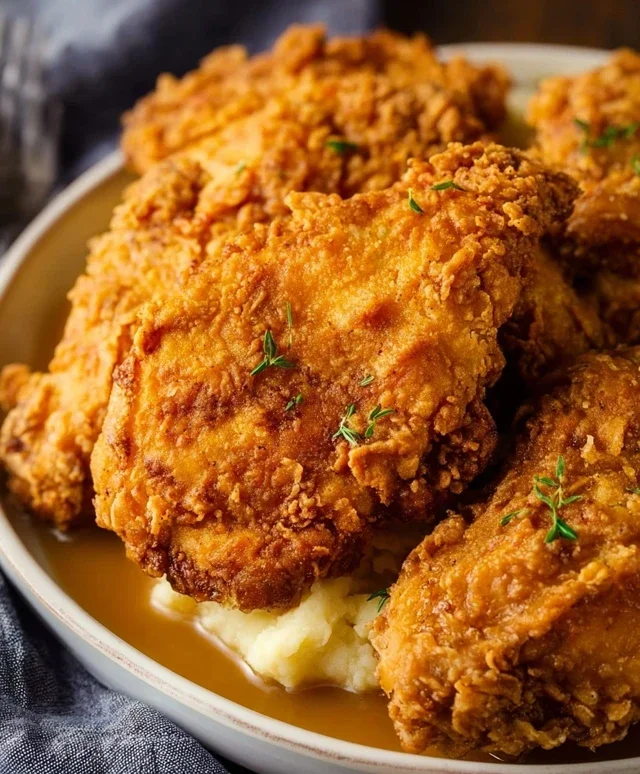
Once all your chicken is fried, you can keep it warm in a low oven (around 200°F / 95°C) while you prepare your sides. Serve hot and enjoy the fruits of your labor! This country fried chicken is perfect with mashed potatoes, gravy, and your favorite greens.
Conclusion:
There you have it – your guide to creating truly exceptional Country Fried Chicken! This recipe is fantastic because it delivers that irresistible crispy, golden-brown exterior that perfectly complements the juicy, tender chicken within. It’s a taste of home, comfort food at its finest, and surprisingly achievable in your own kitchen. Don’t be intimidated by the frying process; with a few key tips, you’ll be a pro in no time. This dish truly shines when served alongside classic Southern sides like creamy mashed potatoes, a tangy coleslaw, or warm biscuits and gravy. For a delightful variation, consider adding a pinch of cayenne pepper to your flour dredge for a subtle kick, or experimenting with different herbs like rosemary or thyme in your seasoning blend. I highly encourage you to give this Country Fried Chicken recipe a try – the aroma alone is worth it, and the taste will have everyone asking for seconds!
Frequently Asked Questions:
What’s the best oil to use for frying chicken?
For the best results and a beautiful golden crust, a neutral-flavored oil with a high smoke point is ideal. Common choices include vegetable oil, canola oil, or peanut oil. These oils can handle the high temperatures needed for frying without burning.
Can I make this ahead of time?
While Country Fried Chicken is best enjoyed fresh and hot right out of the skillet for ultimate crispiness, you can prepare the chicken pieces (season and dredge) a few hours in advance. Store them, uncovered, in the refrigerator. When you’re ready to cook, fry them as usual. Avoid frying the entire batch too far in advance as the coating can become soggy.
My chicken is browning too quickly on the outside. What can I do?
This usually means your oil is too hot. It’s essential to maintain a consistent oil temperature, typically between 325°F and 350°F (160°C to 175°C). Use a thermometer to monitor the temperature, and adjust the heat as needed. Frying in batches also helps maintain the oil temperature and ensures even cooking.
Country Fried Chicken
Classic country-style fried chicken with a crispy, seasoned coating and juicy chicken. A Southern comfort food favorite.
Ingredients
-
4 boneless skinless chicken breasts
-
2 cups buttermilk
-
2 large eggs
-
3 teaspoons salt
-
1 ½ cup all-purpose flour
-
½ cup breadcrumbs
-
2 ½ teaspoons seasoned salt
-
¾ teaspoon paprika
-
½ teaspoon cayenne pepper
-
1 ½ teaspoon black pepper
-
1 ½ cups vegetable oil
Instructions
-
Step 1
Cut chicken breasts into 1-inch pieces. -
Step 2
In a bowl, whisk together buttermilk and eggs. Add chicken pieces and marinate for at least 30 minutes, or up to 4 hours in the refrigerator. -
Step 3
In a shallow dish, combine flour, breadcrumbs, seasoned salt, paprika, cayenne pepper, salt, and black pepper. -
Step 4
Remove chicken from buttermilk mixture, letting excess drip off. Dredge each piece thoroughly in the flour mixture, ensuring it’s well coated. Place coated chicken on a wire rack. -
Step 5
Heat vegetable oil in a large skillet or Dutch oven over medium-high heat until shimmering (about 350°F or 175°C). -
Step 6
Carefully add chicken pieces to the hot oil in a single layer, being careful not to overcrowd the pan. Fry in batches if necessary. -
Step 7
Fry chicken for 5-7 minutes per side, or until golden brown and cooked through. The internal temperature should reach 165°F (74°C). -
Step 8
Remove fried chicken from the skillet and drain on a wire rack set over paper towels.
Important Information
Nutrition Facts (Per Serving)
It is important to consider this information as approximate and not to use it as definitive health advice.
Allergy Information
Please check ingredients for potential allergens and consult a health professional if in doubt.