Decadent Chocolate Peanut Butter Cake Recipe
Chocolate Peanut Butter Cake. The very words conjure up a symphony of rich, decadent flavors that speak to the soul of any dessert lover. It’s a classic for a reason, isn’t it? That irresistible combination of deep, dark chocolate and creamy, salty peanut butter is a match made in culinary heaven, a flavor pairing that sparks instant joy and happy memories for so many of us. What makes this particular Chocolate Peanut Butter Cake so special? It’s not just about ticking the boxes of those beloved ingredients; it’s about the perfect balance. It’s about a moist, tender cake that melts in your mouth, studded with pockets of gooey peanut butter goodness, and enveloped in a luscious chocolate frosting that’s just the right amount of sweet. Prepare yourselves, because we’re about to embark on a journey to create a Chocolate Peanut Butter Cake that will undoubtedly become your new favorite indulgence.
Chocolate Peanut Butter Cake
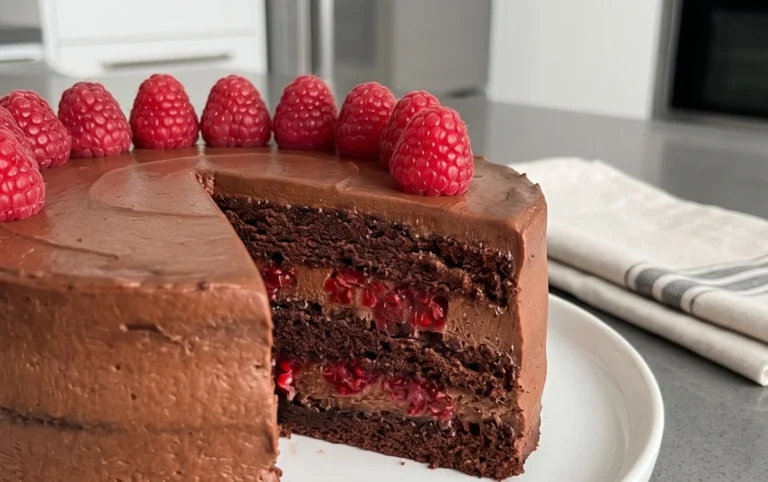
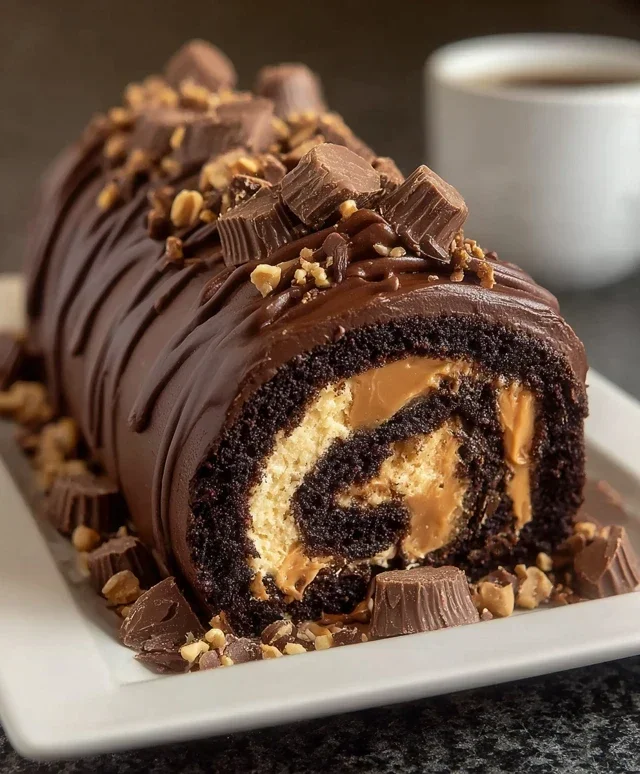
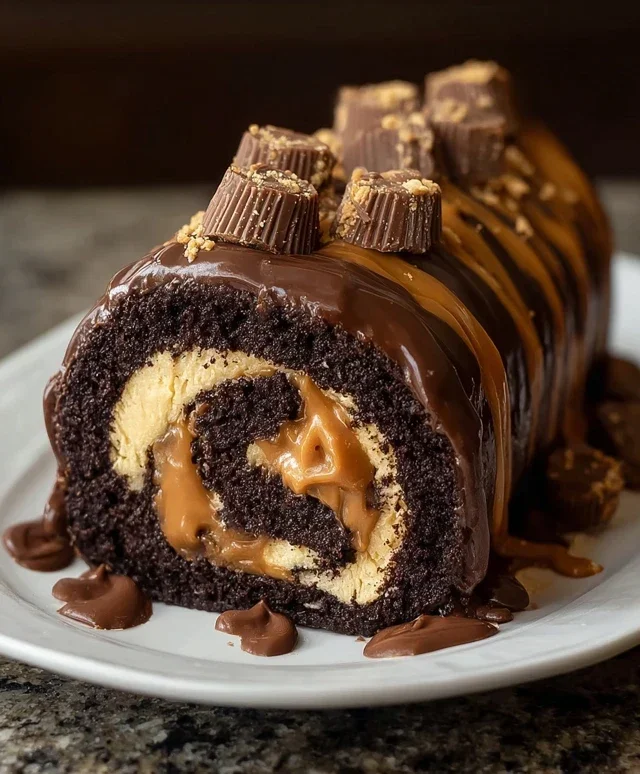
Get ready for a dessert that dreams are made of! This Chocolate Peanut Butter Cake is a decadent symphony of rich chocolate and creamy peanut butter, layered with an irresistible Oreo crust. It’s the perfect treat for birthdays, holidays, or just because you deserve something extraordinary. Forget complicated baking; this recipe delivers show-stopping flavor with a surprisingly manageable process. The secret lies in the smooth, creamy filling that melts in your mouth, complemented by the satisfying crunch of the Oreo base and a luscious chocolate topping. This isn’t just a cake; it’s an experience.
Ingredients:
Instructions:
Prepare the Oreo Crust
The foundation of our masterpiece begin extracts with a simple yet incredibly satisfying Oreo crust. In a medium bowl, combine the 2 cups of Oreo crum extractbs with the 1/4 cup of melted unsalted butter. Stir until the crum extractbs are thoroughly moistened and resemble damp sand. Press this mixture firmly and evenly into the bottom of a 9-inch springform pan. Use the bottom of a glass or a flat-bottomed measuring cup to ensure a compact and even layer. This is crucial for preventing a crum extractbly crust and providing a sturdy base for our creamy filling. Once pressed, place the springform pan in the freezer for about 10-15 minutes while you prepare the filling. This chilling step helps the crust set and makes it easier to remove the cake later.
Crafting the Creamy Peanut Butter Filling
Now, for the star of the show – the peanut butter filling! In a large mixing bowl, beat the 32 oz of softened cream cheese with an electric mixer until it’s incredibly smooth and free of any lumps. This is your time to get it super creamy! Gradually add the 1 1/3 cups of sugar, beating until well combined and the mixture is light and fluffy. Next, introduce the 4 large eggs, one at a time, beating well after each addition. Don’t overmix at this stage; just ensure each egg is incorporated. Now, stir in the 1 cup of smooth peanut butter and the 2 tsp of vanilla extract. Mix until everything is just combined and you have a beautifully smooth, peanut butter-infused cream cheese mixture. Finally, gently fold in the 1/3 cup of heavy cream. This will add an extra layer of richness and help create that signature cheesecake-like texture. Be careful not to overmix once the cream is added; you want to maintain a lovely, airy consistency.
Baking the Cake
Retrieve your springform pan from the freezer. Pour the prepared peanut butter filling evenly over the chilled Oreo crust. Gently tap the pan on the counter a couple of times to release any air bubbles. To ensure even baking and prevent cracks, we’ll use a water bath. Wrap the outside of your springform pan tightly with a couple of layers of heavy-duty aluminum foil. Place the foil-wrapped pan into a larger baking pan. Carefully pour hot water into the larger pan, ensuring it comes about halfway up the sides of the springform pan. Bake in a preheated oven at 325°F (160°C) for approximately 60-75 minutes, or until the edges are set and the center is still slightly wobbly. The gentle heat of the water bath will cook the cake evenly and result in a wonderfully smooth texture. Once baked, turn off the oven, crack the oven door open slightly, and let the cake cool in the oven for another hour. This gradual cooling process also helps prevent cracking. After the hour, remove the cake from the oven and the water bath, remove the foil, and let it cool completely on a wire rack.
Creating the Chocolate Ganache Topping
While the cake is cooling, let’s prepare the luscious chocolate ganache that will crown our creation. In a heatproof bowl, combine the 1 1/4 cups of miniature chocolate chips and the 1/2 cup of heavy cream. You can also use the 1 1/2 cups of milk chocolate chips or 9.5 oz of finely chopped milk chocolate. Heat the mixture gently. You can do this by microwaving in 30-second intervals, stirring well after each, until the chocolate is melted and the mixture is smooth. Alternatively, you can heat the cream in a small saucepan until it just begin extracts to simmer, then pour it over the chocolate chips in a bowl and let it sit for a few minutes before whisking until smooth and glossy. This ganache will be wonderfully rich and pourable.
Assembling and Decorating Your Masterpiece
Once the cake has cooled completely to room temperature, gently pour the prepared chocolate ganache over the top, allowing it to drip enticingly down the sides. You can spread it evenly with an offset spatula for a more polished look, or just let its natural flow create a beautiful cascade. Before the ganache sets, now is the time for the fun decorating! Generously sprinkle the chopped Reese’s cups and the crushed roasted peanuts over the top of the ganache. The combination of the crunchy peanuts and the chewy chocolate of the Reese’s cups will add fantastic texture and flavor contrast. For the best results, refrigerate the cake for at least 2-3 hours, or preferably overnight, before slicing and serving. This allows the flavors to meld and the cake to firm up perfectly. Enjoy every decadent bite of your homemade Chocolate Peanut Butter Cake!
Conclusion:
This Chocolate Peanut Butter Cake is truly a showstopper, offering the perfect harmony of rich, decadent chocolate and creamy, salty peanut butter. It’s surprisingly simple to make, yet delivers an impressive flavor profile that will have everyone asking for seconds. The moist cake layers are complemented beautifully by the luscious peanut butter frosting, creating a dessert that’s both comforting and indulgent. I’m confident you’ll fall in love with its irresistible taste and texture, just like I have!
For serving, I love this cake as is, allowing the classic flavors to shine. However, it also pairs wonderfully with a scoop of vanilla ice cream or a dollop of whipped cream. For variations, feel free to experiment! You could add chocolate chips to the batter for an extra chocolatey punch, or swirl in some extra peanut butter into the frosting. A sprinkle of chopped peanuts on top adds a delightful crunch. I highly encourage you to give this recipe a try; it’s a guaranteed crowd-pleaser and a perfect treat for any occasion, big or small.
Frequently Asked Questions:
Can I make this cake ahead of time?
Absolutely! You can bake the cake layers a day in advance and store them, well-wrapped, at room temperature or in the refrigerator. Frost the cake closer to serving time for the best texture, though it’s also delicious fully frosted and chilled. The flavors actually meld beautifully overnight.
What kind of peanut butter works best?
For the best flavor and texture in the frosting, I recommend using creamy, unsweetened peanut butter. This allows you to control the sweetness of the frosting more precisely. Natural peanut butters can sometimes separate, so give them a good stir before measuring.
Chocolate Peanut Butter Cake
A decadent layered cake featuring a chocolate cookie crust, a creamy peanut butter cheesecake filling, and a rich chocolate ganache topping, finished with Reese’s cups and peanuts.
Ingredients
-
2 cups Oreo cookie crumbs
-
1/4 cup unsalted butter, melted
-
32 oz cream cheese, softened
-
1 1/3 cups sugar
-
4 large eggs
-
1 cup smooth peanut butter
-
2 tsp vanilla extract
-
1/3 cup heavy cream
-
1 1/4 cups miniature chocolate chips
-
1/2 cup heavy cream
-
1 1/2 cups milk chocolate chips
-
Chopped Reese’s cups
-
Crushed roasted peanuts
Instructions
-
Step 1
Preheat oven to 350°F (175°C). Mix Oreo cookie crumbs and melted butter until combined. Press mixture into the bottom of a 9-inch springform pan. -
Step 2
In a large bowl, beat cream cheese and sugar until smooth. Add eggs one at a time, beating well after each addition. Stir in peanut butter and vanilla extract. -
Step 3
Pour 1/3 cup heavy cream into the peanut butter mixture and stir until just combined. Stir in 1 1/4 cups miniature chocolate chips. -
Step 4
Pour the filling over the crust. Bake for 50-60 minutes, or until the center is almost set. Let cool in the oven with the door ajar for 1 hour. -
Step 5
While the cake cools, prepare the ganache. Heat 1/2 cup heavy cream in a small saucepan until simmering. Pour over milk chocolate chips in a bowl and let stand for 5 minutes. Whisk until smooth. -
Step 6
Pour the chocolate ganache over the cooled cake. Decorate with chopped Reese’s cups and crushed roasted peanuts. -
Step 7
Chill the cake for at least 4 hours, or preferably overnight, before serving.
Important Information
Nutrition Facts (Per Serving)
It is important to consider this information as approximate and not to use it as definitive health advice.
Allergy Information
Please check ingredients for potential allergens and consult a health professional if in doubt.