Easy Strawberry Cobbler Recipe- Sweet Summer Dessert
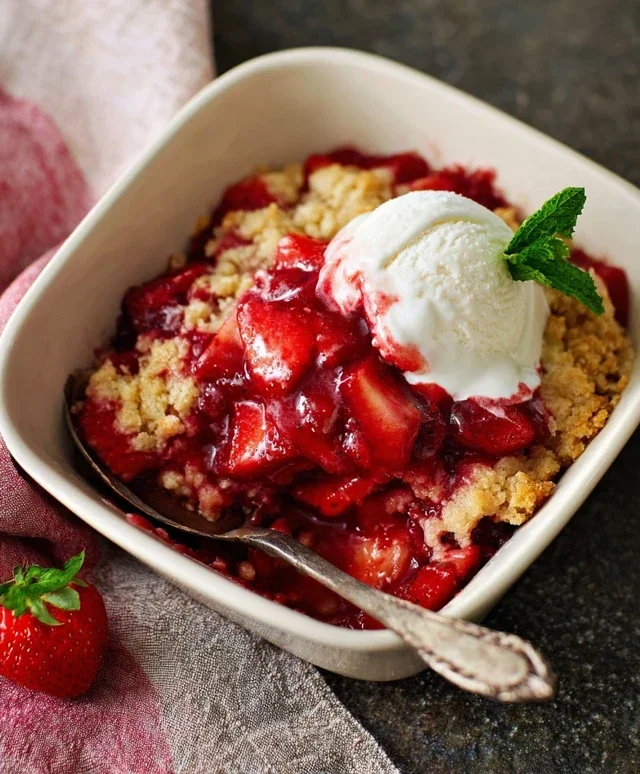
Strawberry cobbler is more than just a dessert; it’s a warm hug in a bowl, a sunbeam on a plate, and a nostalgic trip back to simpler times. There’s something undeniably comforting about the bubbling, ruby-red sweetness of ripe strawberries peeking through a tender, golden biscuit topping. This beloved classic has captured hearts for generations, and it’s easy to see why. The magic lies in its effortless charm – a rustic, forgiving dish that tastes utterly divine even if it’s not perfectly presented. We all crave that sweet escape, that moment of pure bliss after a long day, and a perfect strawberry cobbler delivers just that. It’s a celebration of summer’s bounty, a testament to the joy of simple, wholesome ingredients coming together in delicious harmony. Get ready to create your own little piece of heaven with this irresistible strawberry cobbler recipe.

Strawberry Cobbler
There’s something undeniably comforting about a warm, bubbling cobbler. The sweet, slightly tart burst of fruit, topped with a tender, biscuit-like crust, is a classic for a reason. And when that fruit is plump, juicy strawberries, well, that’s simply heaven. This strawberry cobbler recipe is one of my favorites because it’s straightforward to make, requiring no fancy techniques, and delivers that perfect balance of sweet and tangy, soft and chewy. It’s the ideal dessert for a casual weeknight treat or a delightful addition to any gathering. Let’s get started on this delightful journey to a perfectly baked strawberry cobbler!
Ingredients:
Preparing the Strawberry Filling
The foundation of any great cobbler is a fantastic fruit filling. We want our strawberries to be beautifully tender, bursting with flavor, and slightly thickened so they don’t make the crust soggy.
1. In a medium bowl, I like to combine the 1/2 cup of white sugar and the 2 Tablespoons of cornstarch. Whisking these together first helps prevent lumps of cornstarch from forming later. Then, I gently fold in the 1/4 cup of fresh lemon juice. The lemon juice not only brightens the flavor of the strawberries but also helps the cornstarch to dissolve more easily. Finally, I add the 3 cups of hulled and sliced fresh strawberries to this mixture. I use a light hand to gently toss the strawberries, ensuring each slice is coated in the sugary, lemony cornstarch mixture. The goal here is to coat, not to mash, preserving the integrity of the strawberry slices. This mixture will macerate slightly while we prepare the topping, allowing the juices to begin extract releasing, which is exactly what we want for a luscious filling.
2. Once the strawberry filling is ready, I preheat my oven to 375 degrees Fahrenheit (190 degrees Celsius). This is a good, moderate oven temperature that will allow the cobbler to bake through evenly without burning the topping. I then lightly grease an 8×8 inch baking dish or a similar-sized oven-safe skillet. This prevents sticking and ensures that beautiful golden-brown crust can be easily served. I pour the prepared strawberry mixture into the baking dish, spreading it out evenly. Now, for a little extra richness and a beautiful sheen on top of the fruit, I dot the surface of the strawberries with the 2 Tablespoons of diced cold butter. These little pieces of butter will melt as the cobbler bakes, adding a lovely richness and helping to create a slightly glossy glaze on the fruit.
Crafting the Cobbler Topping
The topping is what truly elevates a cobbler. We’re aiming for a tender, slightly sweet, biscuit-like texture that is golden brown and delightfully crisp on the edges and softer in the center.
3. In a separate, larger bowl, I combine the dry ingredients for the topping. This includes the 1 cup of all-purpose flour, the 1 Tablespoon of white sugar, the 1 1/2 Teaspoons of baking powder, and the 1/2 Teaspoon of salt. I like to whisk these together thoroughly to ensure the baking powder and salt are evenly distributed throughout the flour. This is crucial for a consistent rise and flavor in our cobbler topping.
4. Next, I add the 3 Tablespoons of cold butter, cut into cubes, to the dry ingredients. Using cold butter is key here, as it creates little pockets of fat within the flour mixture. When this bakes, these pockets will melt, creating a flaky and tender texture in our topping. I then use my fingertips or a pastry blender to cut the butter into the flour mixture until it resembles coarse crum extractbs, with some pea-sized pieces of butter still visible. You can also pulse this in a food processor if you prefer, but I find the manual method gives me more control. The goal is not to fully incorporate the butter, but to create that crum extractbly texture.
5. Now, it’s time to bring the topping together. I create a well in the center of the butter and flour mixture and pour in the 1/2 cup of heavy cream. I gently stir with a fork or spatula until just combined. It’s important not to overmix the dough. Overmixing will develop the gluten in the flour, resulting in a tough topping, and we want a tender, biscuit-like texture. The dough will be a little sticky and shaggy, and that’s perfectly okay. This is what will create those delicious, slightly irregular biscuit pieces.
Baking and Serving
The final stage is where all our hard work comes together in a wonderfully aromatic and delicious dessert.
6. I carefully drop spoonfuls of the cobbler topping onto the prepared strawberry filling in the baking dish. I don’t aim for perfect uniformity; rather, I like to scatter the dough unevenly, creating rustic dollops. Some areas will be thicker, some thinner, and this variation leads to a more interesting texture once baked. I ensure there are some gaps between the dollops so the bubbling strawberry filling can peek through. Then, I place the baking dish in the preheated oven.
7. I bake the strawberry cobbler for 30-40 minutes, or until the topping is beautifully golden brown and the strawberry filling is thick and bubbly around the edges. You’ll know it’s ready when you see those vibrant juices simmering. The aroma filling your kitchen will be non-intoxicating! Once baked, I carefully remove the cobbler from the oven and let it cool for at least 10-15 minutes before serving. This resting period is crucial. It allows the filling to set up slightly, preventing it from being too runny when served, and it also prevents you from burning your tongue on molten fruit.
This strawberry cobbler is absolutely divine served warm, perhaps with a scoop of vanilla ice cream or a dollop of freshly whipped cream. The contrast between the warm, sweet fruit and the cold, creamy topping is simply irresistible. Enjoy every delicious bite of this homemade classic!
Conclusion:
I hope you’re feeling inspired to whip up a batch of this absolutely delightful Strawberry Cobbler! This recipe is a true winner because it’s incredibly forgiving, bursting with the sweet, tangy flavor of fresh strawberries, and topped with a tender, biscuit-like topping that’s simply irresistible. It’s the perfect dessert for any occasion, whether it’s a casual family dinner, a potluck with friends, or a special celebration. The aroma filling your kitchen as it bakes is pure bliss, and the taste is even better.
For serving, I highly recommend a scoop of cool vanilla bean ice cream melting into the warm, bubbly fruit. A dollop of freshly whipped cream is also a classic and wonderful accompaniment. If you’re feeling adventurous, consider adding a drizzle of caramel sauce or a sprinkle of toasted almonds over the top.
Don’t be afraid to experiment with variations! You can easily swap out some of the strawberries for other summer berries like blueberries or raspberries, or even add thinly sliced peaches. For a richer flavor, try adding a teaspoon of lemon zest to the fruit mixture. The possibilities are endless!
I truly encourage you to give this Strawberry Cobbler a try. It’s a wonderfully comforting and delicious dessert that’s sure to become a family favorite. Happy baking!
Frequently Asked Questions:
Can I use frozen strawberries?
Absolutely! If using frozen strawberries, there’s no need to thaw them completely. Just toss them with the sugar and cornstarch, and then proceed with the recipe. You might need to bake the cobbler a little longer to ensure the fruit is bubbly and cooked through.
What kind of flour should I use for the topping?
All-purpose flour is perfect for this Strawberry Cobbler topping. It provides the right texture for a tender, slightly crum extractbly biscuit-like crust. No need for anything fancy!
How do I know when the cobbler is done baking?
Your Strawberry Cobbler is ready when the fruit filling is bubbly and the topping is golden brown and cooked through. You can insert a toothpick into the topping; if it comes out clean, it’s done. The edges of the fruit should be visibly simmering.
Strawberry Cobbler
A classic and delicious strawberry cobbler with a tender biscuit-like topping.
Ingredients
-
1/2 cup white sugar
-
2 Tablespoons cornstarch
-
1/4 cup lemon juice
-
3 cups fresh strawberries, hulled and sliced into 1/4 inch slices
-
2 Tablespoons cold butter, diced
-
1 cup all purpose flour
-
1 Tablespoon white sugar
-
1 1/2 Teaspoons baking powder
-
1/2 Teaspoon salt
-
3 Tablespoons cold butter, cut into cubes
-
1/2 cup heavy cream
Instructions
-
Step 1
Preheat oven to 375°F (190°C). -
Step 2
In a medium bowl, combine 1/2 cup white sugar, cornstarch, and lemon juice. Stir until smooth. Add the sliced strawberries and toss to coat. -
Step 3
Pour the strawberry mixture into a 9-inch baking dish or an 8×8 inch pan. Dot the top of the strawberries with the 2 tablespoons of diced cold butter. -
Step 4
In a separate bowl, whisk together the all purpose flour, 1 tablespoon white sugar, baking powder, and salt. -
Step 5
Cut in the 3 tablespoons of cold butter until the mixture resembles coarse crumbs. -
Step 6
Pour the heavy cream into the flour mixture and stir until just combined to form a dough. Drop spoonfuls of the dough over the strawberries. -
Step 7
Bake for 30-35 minutes, or until the topping is golden brown and the filling is bubbly. -
Step 8
Let cool slightly before serving.
Important Information
Nutrition Facts (Per Serving)
It is important to consider this information as approximate and not to use it as definitive health advice.
Allergy Information
Please check ingredients for potential allergens and consult a health professional if in doubt.