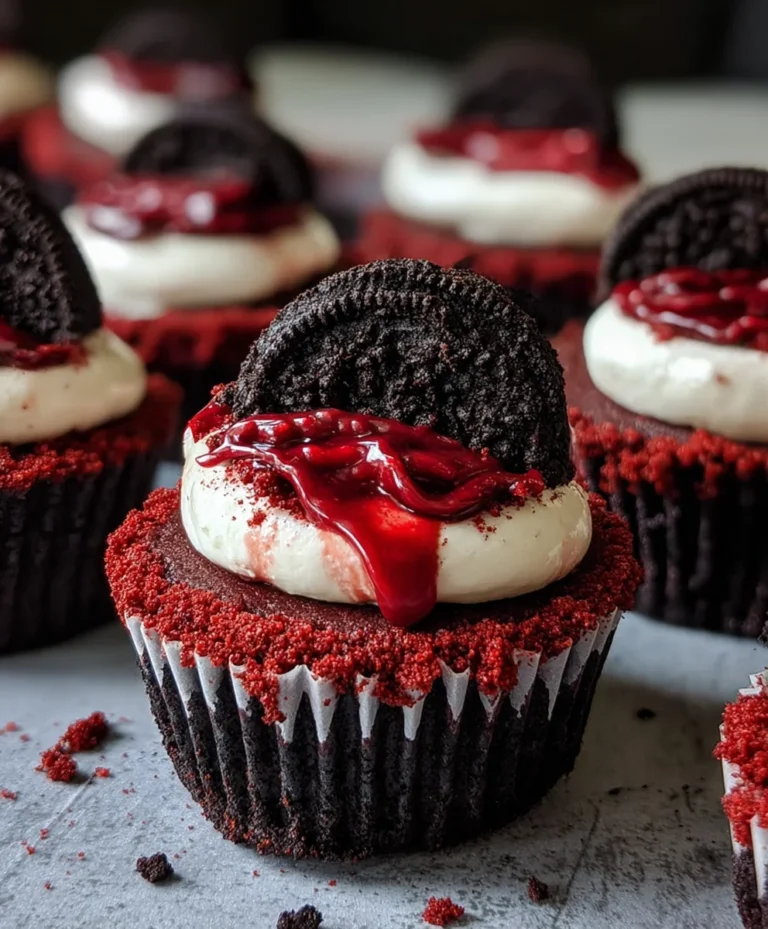
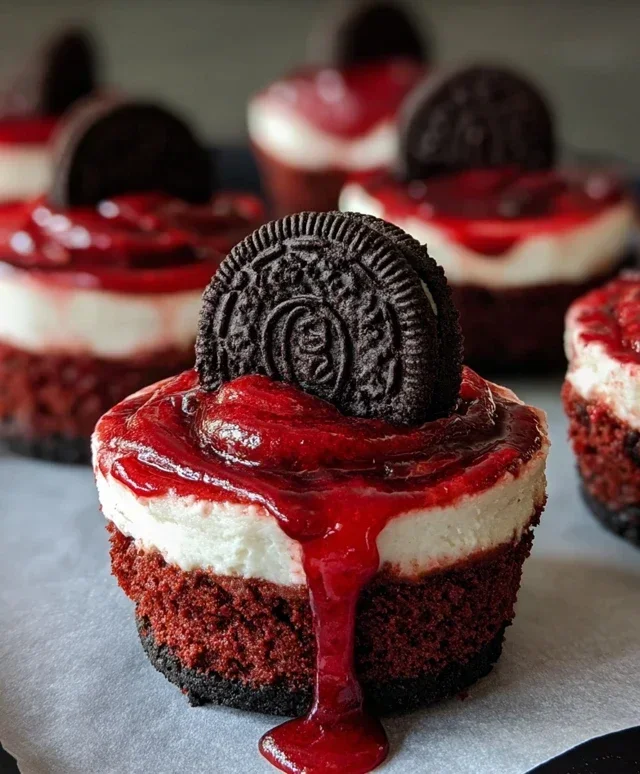
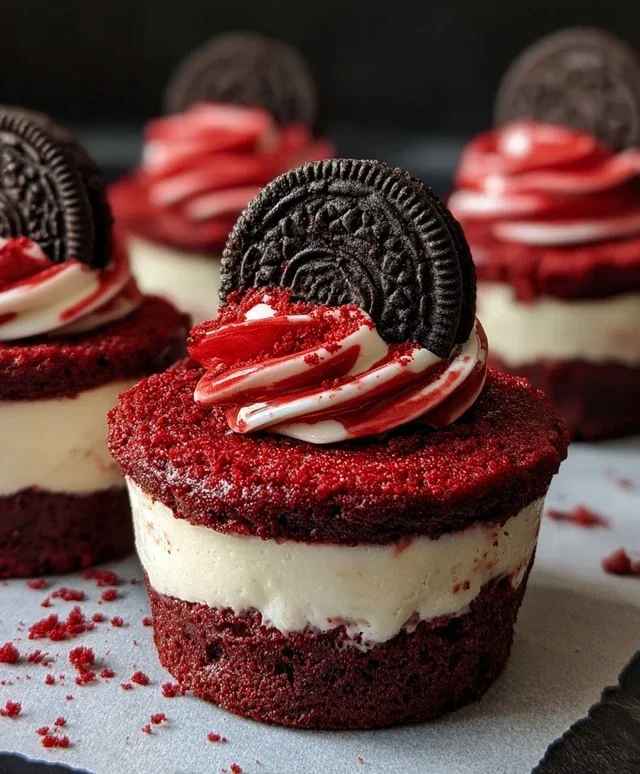
Mini Red Velvet Oreo Cheesecakes Delicious Recipe
Mini Red Velvet Oreo Cheesecakes are the ultimate indulgence, a delightful fusion of two beloved desserts that will steal your heart with every bite. If you’ve ever found yourself torn between the rich, decadent allure of red velvet cake and the creamy, dreamy comfort of cheesecake, your culinary prayers have officially been answered. These Mini Red Velvet Oreo Cheesecakes offer the best of both worlds in perfectly portioned, utterly irresistible packages. Imagin extracte a velvety smooth cheesecake filling, infused with that signature deep red hue and subtle cocoa notes, nestled atop a crushed Oreo cookie crust. Then, picture the elegant swirl of creamy cheesecake marbled with even more of those iconic chocolatey cookies. It’s a visual masterpiece and a flavor explosion waiting to happen. We’re diving into a recipe that’s surprisingly easy to create but delivers an incredibly gourmet experience, perfect for any celebration or just because you deserve something truly special.
Why You’ll Adore These Mini Red Velvet Oreo Cheesecakes
A Dreamy Combination
The magic of these Mini Red Velvet Oreo Cheesecakes lies in their harmonious blend of textures and tastes. The slightly bitter crunch of the Oreo crust perfectly complements the sweet, creamy tang of the cheesecake. The red velvet adds an unexpected depth and a beautiful visual contrast, making them a showstopper. They’re not just desserts; they’re an experience.
Mini Red Velvet Oreo Cheesecakes
Get ready to impress with these utterly divine Mini Red Velvet Oreo Cheesecakes! These little bites of heaven are a playful twist on a classic, combining the rich, decadent flavor of red velvet cake with the creamy indulgence of cheesecake, all nestled on a crunchy Oreo crust. Perfect for parties, dessert buffets, or just a special treat for yourself, these mini cheesecakes are surprisingly easy to make and guaranteed to disappear in a flash.
Ingredients:
Instructions:
Making the Oreo Crust
1. Prepare the Oreo crust: We’ll start by creating a delightful foundation for our cheesecakes. Take your 12 Oreo cookies and place them into a food processor. Pulse them until they are finely ground into crum extractbs. If you don’t have a food processor, you can place the cookies in a resealable plastic bag and crush them with a rolling pin until they are fine crum extractbs. In a medium bowl, combine the Oreo crum extractbs with the melted unsalted butter. Stir until the crum extractbs are evenly moistened and resemble wet sand. This mixture will hold together when pressed.
2. Form the crust in the muffin tin: Now, we’ll get our muffin tin ready. Lightly grease a standard 12-cup muffin tin with non-stick cooking spray or butter. Alternatively, you can line each cup with a mini muffin liner. Spoon about 1 tablespoon of the Oreo crum extractb mixture into the bottom of each muffin cup. Use the back of a spoon or a small tamper to firmly press the crum extractbs down to create an even, compact crust. This step is crucial for a sturdy base. Make sure you press down well, especially around the edges, to prevent the crust from crum extractbling when you remove the cheesecakes.
Preparing the Red Velvet Cheesecake Filling
3. Combine dry ingredients for the red velvet cake layer: In a separate medium bowl, whisk together the 3 tablespoons of all-purpose flour, 1/2 cup of cocoa powder, 1/2 cup of granulated sugar, and a pinch of salt. Make sure there are no lumps in the cocoa powder; whisking thoroughly will ensure a smooth texture. This is the base for our flavorful red velvet cake component.
4. Mix wet ingredients and combine with dry: In another bowl, whisk together 1 room temperature egg, 1/2 teaspoon of vanilla extract, and the melted unsalted butter (ensure it’s slightly cooled so it doesn’t cook the egg). Pour the wet ingredients into the dry ingredients and mix until just combined. Do not overmix; we want a tender red velvet cake batter. This will form the distinct red velvet cake swirls within our cheesecakes.
5. Create the creamy cheesecake batter: In a large bowl, beat the 8 oz of room temperature cream cheese until it’s completely smooth and creamy. This is where the magic of cheesecake happens. Make sure your cream cheese is truly at room temperature; it makes a huge difference in achieving a lump-free batter. Next, beat in the 1 room temperature egg, 1/4 cup of sour cream, and 1/4 cup of granulated sugar until well combined and smooth. Stir in the 1 tablespoon of cocoa powder and 1/2 teaspoon of vanilla extract. Finally, add a generous amount of red gel food coloring. Start with a few drops and add more until you achieve a vibrant, deep red color. Gel food coloring is best as it won’t add extra liquid to the batter. Mix until the color is uniformly distributed.
Assembling and Baking the Mini Cheesecakes
6. Layer and swirl the batters: Now for the fun part – assembly! Spoon about 1 tablespoon of the red velvet cake batter over the Oreo crust in each muffin cup. Then, carefully spoon about 2 tablespoons of the red velvet cheesecake batter over the cake batter in each cup. Once both batters are in, gently swirl them together using a toothpick or a skewer. Insert the toothpick into the batters and drag it through in a swirling motion. Don’t over-swirl, as you want distinct layers and pockets of both flavors. Aim for a marbled effect.
7. Bake and cool the cheesecakes: Preheat your oven to 325 degrees Fahrenheit (160 degrees Celsius). Place the filled muffin tin on a baking sheet to catch any potential drips. Bake for 18-22 minutes, or until the edges of the cheesecakes are set and the centers are just slightly jiggly. They will continue to set as they cool. Once baked, remove the muffin tin from the oven and let the cheesecakes cool completely in the tin on a wire rack. This is important to prevent cracking. After they have cooled to room temperature, cover the muffin tin with plastic wrap and refrigerate for at least 4 hours, or preferably overnight. This chilling period is essential for the cheesecakes to firm up properly and develop their signature rich flavor.
Serving Your Masterpieces
Once chilled, carefully remove the mini cheesecakes from the muffin tin. You can gently run a thin knife around the edges to help release them if needed. Serve them as is, or garnish with a dollop of whipped cream, a sprinkle of red velvet crum extractbs, or even a miniature Oreo cookie. Enjoy these delightful Mini Red Velvet Oreo Cheesecakes!
Conclusion:
There you have it! These Mini Red Velvet Oreo Cheesecakes are an absolute triumph of flavor and texture, combining the rich, decadent notes of red velvet with the satisfying crunch of Oreo cookies, all nestled within a creamy, dreamy cheesecake. They’re surprisingly simple to make, making them perfect for both seasoned bakers and kitchen newcomers looking to impress. The individual portions make them ideal for parties, potlucks, or simply a delightful treat for yourself. I truly encourage you to give this recipe a try; you won’t be disappointed!
For serving, these little gems are fantastic on their own. However, you can elevate them further with a dollop of whipped cream, a scattering of chocolate shavings, or even a drizzle of extra raspberry sauce if you’re feeling adventurous. Thinking about variations? Feel free to experiment with different cookie bases like chocolate chip or grabeef ham crackers, or even add a swirl of cream cheese frosting to the red velvet batter for an extra layer of indulgence. No matter how you choose to customize them, these Mini Red Velvet Oreo Cheesecakes are sure to be a hit!
Frequently Asked Questions:
Can I make these ahead of time?
Absolutely! These Mini Red Velvet Oreo Cheesecakes can be made a day or two in advance and stored in the refrigerator. This is a great advantage if you’re planning a party and want to get some of the preparation done ahead of time. Just be sure to cover them tightly to keep them fresh.
What if I don’t have mini cheesecake pans?
No problem at all! You can adapt this recipe for a standard 8-inch or 9-inch springform pan. You’ll likely need to adjust the baking time slightly. Keep an eye on it, and use the toothpick test to ensure it’s set in the center.
Mini Red Velvet Oreo Cheesecakes
Decadent mini cheesecakes with a chocolate Oreo crust and a vibrant red velvet cream cheese filling.
Ingredients
-
12 Oreo cookies
-
1/4 cup unsalted butter, melted
-
8 oz cream cheese, room temperature
-
1 egg, room temperature
-
1/4 cup sour cream, room temperature
-
1/4 cup granulated sugar
-
1 tablespoon cocoa powder
-
1/2 teaspoon vanilla extract
-
Red gel food coloring
Instructions
-
Step 1
Crush Oreo cookies into fine crumbs. Mix with melted butter until combined. Press mixture into the bottoms of 12 mini muffin cups lined with paper liners. -
Step 2
In a medium bowl, beat cream cheese until smooth. Add egg and beat until just combined. -
Step 3
Stir in sour cream, granulated sugar, cocoa powder, and vanilla extract until smooth. -
Step 4
Add red gel food coloring gradually until desired red color is achieved. Mix until uniform. -
Step 5
Spoon the red velvet cream cheese mixture over the Oreo crusts in the mini muffin cups. -
Step 6
Bake at 325°F (160°C) for 18-20 minutes, or until the edges are set and the centers are slightly jiggly. -
Step 7
Let cool completely on a wire rack. Chill in the refrigerator for at least 2 hours before serving.
Important Information
Nutrition Facts (Per Serving)
It is important to consider this information as approximate and not to use it as definitive health advice.
Allergy Information
Please check ingredients for potential allergens and consult a health professional if in doubt.